Placing Parts On Back Order
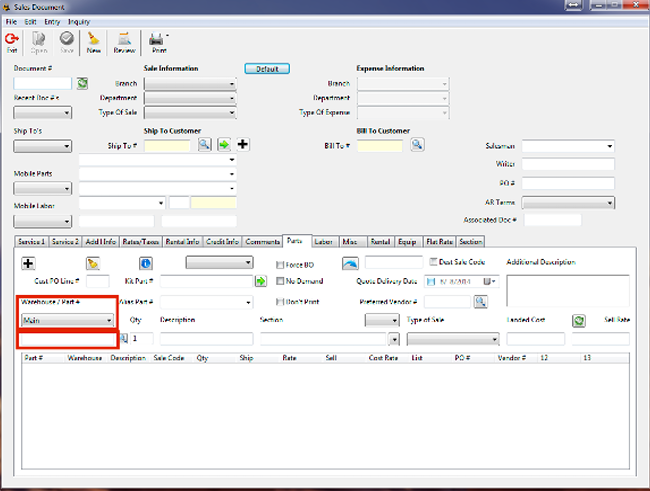
If parts are for a customer order you must first retrieve the customer work order in Softbase 3.0 Invoicing, then under the Parts tab you will need to select the warehouse that you would like to sell the parts from. Then enter the part #.
If the program recognizes the part # within the database, the description will auto populate in the description field.
*If it does not auto populate then you need to first verify that you entered the correct part #. If so, you will need to add the part to inventory before you can charge it out on the work order. There is a simple way to accomplish this straight from the work order. Simply click the Info button. This will take you directly to the main parts screen so you can set the part up properly. When you are done setting up the part and have clicked the add button, simply exit the parts screen. Then on your work order you will just need to refresh that part # (you can easily do this by removing the last digit then entering it again).
Next make sure your quantity is correct. The price will auto populate based upon how you set the part up. You do have the ability to sell the part at a different price if you choose to do so. Then just click the plus sign to add the part to the work order. (Or if your cursor is in the qty field you can just press enter.)
If your On Hand qty in the parts database is currently less than the qty you are attempting to sell you will receive a small window asking if you want to back order them. Simply click Yes.
Then you will be prompted with another small window where you can choose the routing priority and preferred vendor and cost.
When you click ok you’ll notice now the part has been added to your work order AND is highlighted in a light red/pinkish color. This highlight indicates the item is a backordered item.
You can process all of your work orders throughout the day in this manner. Then when you are ready to place your order with your vendor you will need to create a Purchase Order.
Purchase Orders
Creating a new Purchase OrderFollow steps 1 through 5 as shown in this illustration.

After your PO is created you can add items to it.
Back Order tab
Any parts showing up in this tab are coming from work orders as back ordered items. If they are showing up in this tab they HAVE NOT been assigned to a Purchase Order yet. This is your “to-do list” as far as back orders are concerned. (A common misconception about this tab is that all of these parts are assigned to the purchase order # shown at the top. That is NOT the case. You still need to create a PO and select the parts from this list that need to be ordered from the specified vendor.) Once you’ve selected parts, click the Order button to assign the selected parts to the specified Purchase Order. When you do so, you’ll notice those parts disappear from your list.
Parts tab
Any parts showing up in this tab HAVE been assigned to the specified PO and will need to be received when the parts arrive. If you need to correct any costs, do so here BEFORE you receive the items.
PO Export
This feature is available for certain vendors. Once your PO is created and all parts have been added to it you can click the Export menu at the top of the PO window. Select the appropriate vendor from the list. You will then be prompted to identify where you want to save the file. When you make a selection and click ok the program will create the appropriate format of the upload file as required by the vendor. We suggest saving it to your desktop for easy locating. Then you can log into your vendor’s site and upload your order.
Receiving Parts
In the Purchase Order window under the Parts tab first check pricing. If you need to adjust your costs do so before receiving, then click the Recv button. This will open a window where you can select the line items that you want to receive.
If you are receiving the full quantity just click the select checkbox.
If you need to receive partial quantity click directly on the quantity to receive and change it to the number that you actually need to receive. The original quantity is listed in a column on the left. Qty to Recv column is right next to the check box on the right. After adjusting the qty click the checkbox then click the Receive button.
Miscellaneous Items
If you have a Misc item that needs to be on a work order and also associated with a PO, on the Invoicing window under Misc tab enter the item that is to be back ordered. Then enter the PO # that it should be assigned to in the Purchase Order # field. Select the line item that you want to assign to that PO and click the yellow folder button.
Receiving Misc Items
Misc items can be received in the 3.0 Purchase Order screen.
Enter the PO # then click on the Misc tab.
Select the line item you want to receive.
Check the field labeled “Account #” – If this is blank you’ll need to enter the appropriate GL account number, get with Accounting if you don’t know what it is.
Check the Cost field – If the cost is incorrect make the necessary change then click the green check button to save the change.
After updates have been made simply select the line item and click the “Recv” button.

Stock Orders
If you only need to process a stock order you can do it one of two ways. You can either process your stock order manually (part by part) or you can run the auto stock order function.
The first step is to create you PO.
Then if you are going to do the manual process simply go to the parts tab and begin entering each part number and quantity you would like to order.
In the Part # field enter the part number.
In the Qty field enter the quantity you would like to order.
In the Cost field adjust the cost if necessary.
Click the green button to add the part to the order.
Then repeat for any other parts that need to be included on the order.
Auto order
If you want to process an Auto Stock Order simply create your PO then click the Auto Stock tab
Select the Warehouse(s) and Group(s) you would like to run the auto order on. Then click Generate.
This will evaluate the parts within the specified warehouse and assigned to the specified groups and will reference the criteria you have identified in the Group Setup. The results will populate in a list under the Parts tab on the PO. You will then need to review the list and remove any items that you do not wish to order or add items that you would like to include on your stock order prior to committing the order to your vendor.
Was this article helpful?
That’s Great!
Thank you for your feedback
Sorry! We couldn't be helpful
Thank you for your feedback
Feedback sent
We appreciate your effort and will try to fix the article