The PM database keeps track of the preventative maintenance schedule for each piece of equipment according to its serial number. This is where you will go through the process of setting up a piece of equipment for which you have a preventative maintenance agreement.
Before you can enter all of the information for your maintenance agreement, you will first need to ensure the serial # has been setup in the database. If it has not, you will need to go into the Equipment window first before you can proceed here.
Setup PM Agreement
The first step in setting up your maintenance agreement is to identify which piece of equipment you are referencing. You can do this by either manually entering the serial # into the serial # field or you can use the magnifying glass button to search the database.
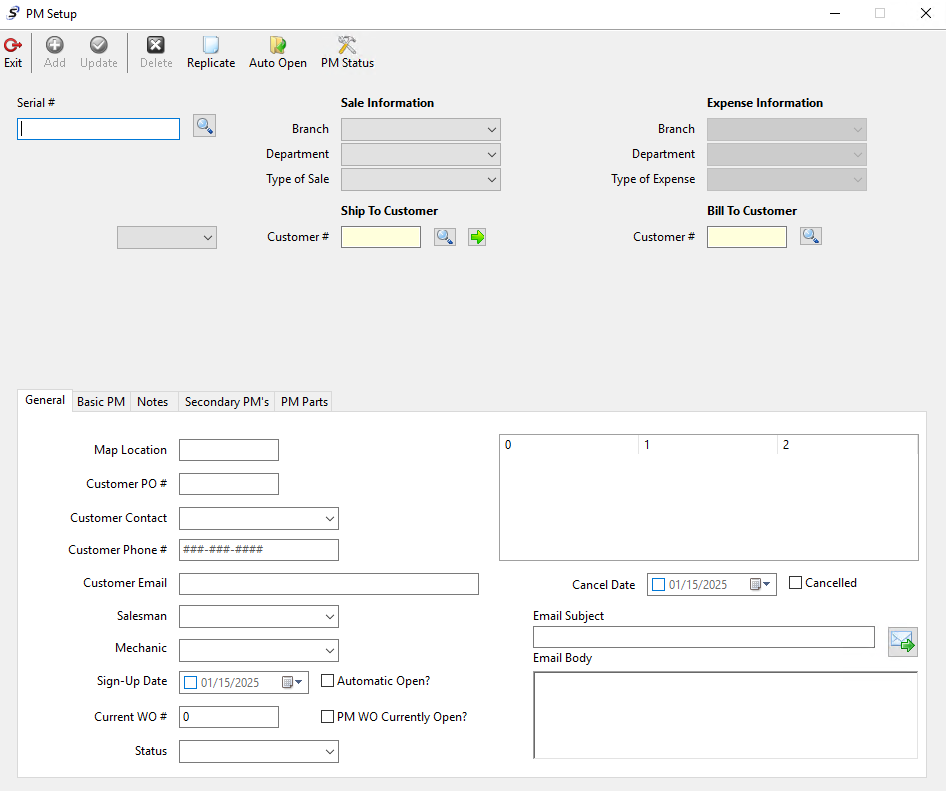
Once you have the serial # field populated you will need to move to the right and fill in the Sale Information section just as you would if you were opening a work order. Of course the Department should be PM.
Next complete the Expense Information section if necessary. If the customer is getting invoiced each time you service their equipment you will not need to complete this section. However, if you are setting up one that will be billed internally you will need to complete this side to identify which branch and department are responsible for the expense.
Next you will need to complete the fields under the General tab.
Map Location - This is an optional field, the original purpose of this field was to identify the key map page back in the days when technicians primarily used key maps aka map books to locate their job sites. Since most technicians now use smartphones or GPS technology this field has become more dormant.
Customer PO # - This field is typically only used for situations such as when you have a customer who issues a ‘blanket‘ PO to you to cover the PM service for the whole year. A lot of times this field is left blank because a different PO is required for each service.
Customer Contact - This is where you will identify the name of the person that you should contact each time the service comes due.
Customer Phone # - This field is for you to enter the phone number that you should call to reach the contact person in an effort to schedule the PM service.
Mechanic - A lot of times this field is left blank. However, if you have a customer who only wants one particular mechanic servicing their equipment you can enter the mechanic here.
Sign Up Date - You will need to check this box and enter the date the agreement went into effect.
Automatic Open - We recommend you select this check box when setting up any new PM agreements even if you are currently not using the auto open function. This is so that if you do decide in the future to utilize that feature you would not have to go back and retrieve each piece of equipment to check this box individually.
Current WO # - This field only needs to be populated if there is already a PM work order open for the same piece of equipment at the time you are doing the setup in the program. This is so the program will know to start tracking from that work order rather than wait for the next.
PM WO Currently Open - If you entered a work order # into the Current WO # field then go ahead and check this box.
Then go to the Basic PM tab.
Most companies will use Frequency days rather than Frequency Hours because it is much easier to track this way. So if you agreed to perform PM service every 3 months you would enter 90 in the Frequency Days field.
Last PM Labor Date - If you know when the last PM service was complete you can go ahead and enter that date here.
Last PM Primary Meter - If you know what the hour meter reading was during the last PM service you can enter the meter reading here.
Next PM Date - This field is for when the next PM service is due.
Labor Charge, Parts Charge, Misc Charge - If you charge a flat fee for any of these items when invoicing your customer you can enter those fees here. For instance, if you agreed to $85 plus parts for each PM service, you would enter $85 into the Labor Charge field and leave the Parts Charge field blank. This is so that labor will be charged at $85 total and parts would be charged at whatever the current prices are at that time.
Comments to Appear On PM Work Orders - Anything you enter here will print on the work order. So if you simply want to type something like PM Service Due, then each time you open a new PM service work order for this equipment this comment will appear.
Those are the required items for setting up PM service agreements. The only thing left to do is click Add at the top of the screen to save all of your entries in the database to the serial # you selected.
There are other tabs as well that you can use.
Notes - The purpose of this tab is for your call notes. So basically when you are ready to schedule service you can go into the PM Setup screen and retrieve the equipment. Call your customer to schedule. Then you can use this tab to make notes based on your conversation regarding the service. There is a clock button that you can push to enter the current date and time followed by a dash then you can enter your notes behind the dash. When you are done making notes, click update at the top.
Secondary PM - This tab can be used for any secondary type of PM service that you would like to set up, such as a yearly service or something like that.
PM Parts - This is a suggested list that can be built to help speed along the process when preparing to send a mechanic out to perform the service. There is a report in the reports database that will print this list. If you choose to use this tab, you can run that report and give a copy to your Parts Dept to acquire the needed parts ahead of the scheduled service date. **Note There is a common misconception regarding this tab. People tend to assume this will create a pull list that will post to work orders. Please know that is not the case. Any parts that get charged to work orders are affecting the inventory for the Parts Dept. Therefore if this were a pull list that posted to the work order automatically the parts inventory would be affected in a big way especially if you used the auto open function to open multiple work orders at one time. This could be a potential problem obviously for the Parts Dept.
Setting up PM for multiple pieces of equipment for the same customer:
Once you have gone through the steps to set up the first one, you can utilize the Replicate button at the top. When you click the Replicate button, a small window will appear for you to enter the next Serial #, then click OK. Then click Add.
************************************************************
Note:
Once the setup is done you will only come into this screen to make your call notes or if you need to make a change to the setup. The only other reason to revisit this window is if you choose to use the Auto Open function. As for the next due date, this will change automatically based on the work orders.
At the time of invoicing the program will look for any work orders that are opened to PM Department. Then it will identify the Serial # on the work order and match it with what is setup in this screen. If it finds a match, the due date will change when you invoice the current work order. The due date will be based on the labor entry on the work order. This entry should show PM labor in your onscreen view of the work order.
Another side note regarding the Next PM Due date field - If you have a work order opened and customer decides to skip the PM service, you can simply remove any charges ($$) that are showing on that work order and close it at $0. What the PM program will do is first recognize it as a PM Department work order, then identify the serial # on the work order, then identify that no PM Labor was entered, therefore it will assume it is a ‘Skip By Request’, thus changing the Next PM Due date field to show the next interval.
Reports - On your reports tab you will find several reports for PM service. The most commonly used is PM List by Due Date. There is another one that also shows suggested Parts list if you used that tab in the setup.
This report should show all PM services that are showing to be due within the date range that you entered. You can use this report to identify which customer you need to call to schedule service.
************************************************************
Open PM Work Orders
The next step is opening your work orders. You can open them manually just as you do all of your other work orders. Or you can use the Auto Open function.
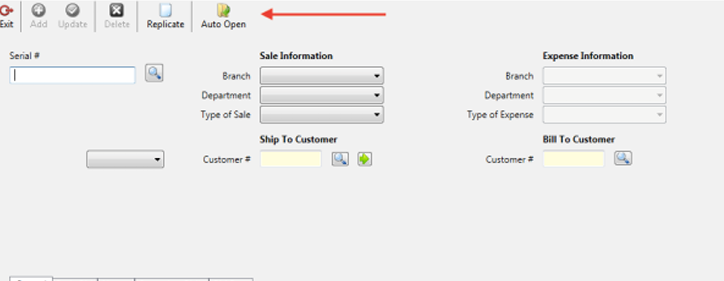
Auto Open
You can access the Auto Open function in the PM setup window.
Open All PM’s - If you want to open all PM work orders that are due within a specified date range, simply select the appropriate Branch, Department, and PM Type and set the desired date range. Then click OK to open all PM service work orders that are due within that date range.
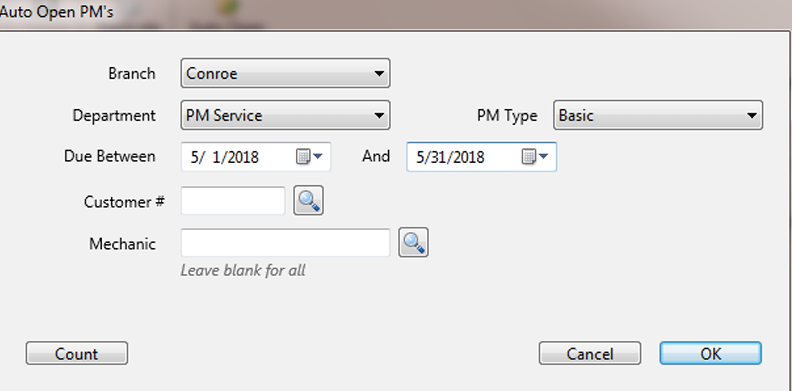
Open Customer PM’s - If you want to open all PM work orders that are due within a specified date range but only for a specified customer, follow the same steps but also enter the customer account number that you want the program to open work orders for.

You will also notice that there is a Count button, if you want to know how many PM services are due given the provided criteria click this button. Three numbers will appear above the count button. The first number will show how many total PM services would be opened if there was no specific customer account or mechanic selected. The second number shows how many PM service work orders would be opened for the specific customer account selected. The third number shows how many PM service work orders would be opened for the specific Mechanic selected.

When you click OK the program will run through any PM’s that are due based on your criteria and open a work order for each one.
Note: If a PM work order is already open the program will not open an additional work order. Also, if a customer is on credit hold, the system will pop up a message to notify you that a work order cannot be opened for a specific serial number because the customer account is on credit hold.
When the process is complete you will see the total number of work orders opened displayed just above the OK button. When you are ready to exit the Auto Open window simply click Cancel.
You can find your open work orders by going into the Invoicing window. Select the Inquiry menu then select Work In Process.

In the Work In Process window just choose the Branch and PM department. Then click Search. This will retrieve a list of all open PM Work Orders. To find the work orders you just opened click on the ‘Opened’ column header. This will sort by date. You may have to click a second time to get the sort in the appropriate order.
Was this article helpful?
That’s Great!
Thank you for your feedback
Sorry! We couldn't be helpful
Thank you for your feedback
Feedback sent
We appreciate your effort and will try to fix the article