Parts Overview
Parts Setup
Warehouse Setup
The Warehouse is used to indicate where the Parts and quantity of the parts are located (Warehouse tab). This could be a physical building, service van, consignment location or any value that would like that can represent where your quantity of the part can be located at. Select the Service Van or Consignment checkbox if you want to indicate that the warehouse can have inventory replenished by a Warehouse not setup as a Service Van or Consignment.

The Warehouse allows you to identify the Parts Inventory GL Account that is used for parts in that Warehouse. That value can be overridden by a Parts Group setup with a different Parts Inventory GL Account.
The Warehouse determines the Costing Method that is used when adding Parts to a Work Order and updating Cost. The options are;
Replacement Cost which is the last cost the part was received at.
This option is used when the FIFO Inventory Cost checkbox isn’t set.
FIFO Inventory Cost which indicates that the cost of the parts that were first received will be used first.
This Option is used when the FIFO Inventory Cost checkbox isn’t set.
The Average Cost option is currently not available.
Parts Groups Setup
The Parts Group is used to group like Parts together. It could be parts purchased from the same vendor, same type of parts or similar cost parts. Following are some of the features of the Parts Group that can help determine how to set up Groups.
Costing and Pricing Multiples are set up at the Parts Group level to indicate the different pricing levels a part can be calculated and sold at.
The Parts Inventory GL Account can be overridden on the Parts Group.
The Parts Group contains the parameters that can be used to determine the stocking quantity of a part that is used when running Automatic Stock Orders to purchase parts.
There are parameters used to calculate the Phase In and Phase Out parameters that can update the status of the part to indicate whether it should or shouldn’t be stocked.
If you have access to Vendor Price Files you can import the Price Files and indicate what Parts Groups can be updated with costs and part information from the price file. Parts can also be created from the price file in that Parts Group.
There are parameters that can be used to evaluate the Demand of the Part and determine how fast of a mover the part is. The demand of a part is the total quantity of a part that is added to an Open Work Order.
Adding a Part Number
To set up a Parts Inventory record in Softbase use the Parts Window that can be accessed from the General Tab.
When setting up a new part the following fields are required:
Warehouse.
Part Number.
Parts Group.
Other important fields that are recommended to setup include:
Cost.
Bin Location.
Description.
When the required fields are populated when adding a part use the Add button on the Toolbar to add the Part Number to the Parts Inventory in Softbase.
Some default fields that are automatically set when creating new Part Number in Softbase are as follows:
Bin Location is set to New.
Stock and Prior Status are set to New.
Add and Change Date are set to the Current Date.
Automatic Order is turned on for the Part.
Master Part Number defaults to the Part Number which is used to display information about all parts with the same Master Part Number in different Warehouses.
Pricing Multipliers are defaulted based on the Parts Group selected.
A Part Number must be unique in the Warehouse it is set up in.
Updating a Part Number
To update information about a Part Number in Softbase, after you have pulled up the Part Number in the Parts Window in the correct warehouse, make your changes to the necessary field(s) and then choose the Update button  that becomes enabled.
The User and Date the user changed the Part Number will be tracked on the Dates tab of the Part Number.
The Part Number itself cannot be changed.
Deleting a Part Number
To Delete a Part Number from Softbase, after you have pulled up the Part Number in the Parts Window in the correct warehouse, make your changes to the necessary field and then choose the Delete button that becomes enabled.
You are not able to Delete a Part Number that has one of the following conditions;
Has On Hand Quantity not equal to 0.
Is on an Open Purchase Order
Is on an Open Work Order
Is on an Open Work Order Quote
Parts Quantity Tracking
The On Hand Quantity of the Part Number is intended to represent the quantity of the Part Number that a Warehouse currently has of the part. These parts can be located on a stocking shelf, in WIP on Open Work Orders or in process of being loaded to a Service Van that will be providing Mobile Services to Equipment. Understanding what can impact the On Hand quantity of a part will allow you to ensure you have procedures in place to effectively manage that inventory.
What impacts Parts On Hand Quantity?
The following features and options in Softbase can impact the On Hand Quantity of a Part Number;
Updating the On Hand Qty field in the Part Number record
When a change is made to this field and saved a message does prompt for why you are making the change
Receiving a Part Number on a Parts Purchase Order
Selling or Returning a Part on an Open Work Order
Transferring a Part Number from one Warehouse to another
Replenishing a Service Van or Consignment Warehouse
Processing a Cycle Count or Physical Inventory Count
Copying a Warehouse to another Warehouse
Displaying Part On Hand Quantity Changes
You can see details about the On Hand Quantity changes if you go to the Movement Tab which is found on the Inquiry Tab of the Part Number.
In the Reports Tab under the Parts section there is also a report called; Parts On Hand Change, that allows a user to select a date range and see information about all Parts that had a quantity change in that time.
FIFO Quantity
If the Part Number is set up in a Warehouse that is set to use FIFO Inventory Cost, there is a FIFO Section on the Pricing/Qty Tab of the Part Number that shows the details of the Part Number quantity and the FIFO Cost.
These entries are made and updated when receiving the Part Number in on a Parts Purchase Order or when selling and returning a Part on an Open Work Order.
This Section allows you to manually add and remove FIFO entries to ensure that the FIFO quantity matches up with the On Hand Qty of the Part.
An option is available by going to the Setup Button on the Parts Window and choosing the Correct FIFO Tab to mass update all Parts in a Warehouse that have a different FIFO Detail Quantity than the On Hand Quantity of the Part. This will update the FIFO Detail Quantity to match the On Hand Quantity of the Part if this option is run.
Parts Costing and Pricing
The Part Number Cost and Pricing setup is maintained on the Part Number record. The Costs and Prices that are setup and displayed here are used in other programs in Softbase including when Purchasing and Receiving Parts, Selling Parts on a Work Order or transferring parts from one Warehouse to another.
Pricing Levels and Setup
The Costing and Pricing Multipliers are set up on a Parts Group and are used when you set up a Part Number in that specific Parts Group. The default price levels that you can setup multipliers for are;
Cost
Discount
List
Internal
Warranty
Wholesale.
These pricing levels are used to create flexible pricing structures for dealers to sell parts to their customers.
When entering the Price Values in the specific fields on the Part Number record the real pricing will be displayed to the right of that pricing level field based on the Price Level and Multiplier used for that Pricing Level.
Customer Pricing Setup
A dealer will determine the prices for a specific customer by using the options included on the Parts Tab of the Customer Window for the specific Customer. The options to setup pricing include:
General Parts Rate and Percentage
This is used to indicate the pricing level and multiplier against that pricing level for all parts sold to a customer.
Parts Group
This allows a user to select a Parts Group and then identify the pricing level and multiplier that can be used to sell parts in that specific Parts Group to the customer.
This overrides the General Pats Rate
Parts Price
This allows a user to select a specific part and set the sell price manually.
The user can select an expiration date for this price
This overrides the General Parts Rate and Parts Group Pricing Level.
National Account Pricing
This option can be used for a Parts Group that is setup to be updated from a Crown Price File and correlates to specific national accounts and price levels on the Crown Price File.
When Parts are added to a Work Order the calculated selling price based on the setup above for the Customer will be used as the selling price on the Work Order.
On the Pricing/Qty Tab of the Part Number there is a Customer # field where the user can enter the Customer Number and it will display the calculated price of the Part Number for the Customer based on the setup outlined above.
Purchasing Parts
Creating a Purchase Order
The dealer can create a Parts Purchase Order by going to the PO button on the Parts Tab or using the Purchase Order button from the General Tab on the Main Menu.
The dealer would assign the new PO Number and then set the following fields to be able to open a new Purchase Order;
Branch
Department
Vendor Number
Once the required information is populated a user can choose the Open PO button to create the Purchase Order in order to add parts to it.
Vendors are typically set up by the Accounting Department on the Accounting Tab of the Softbase Main Menu.
Adding Stock Parts to a Purchase Order
Once a Parts Purchase Order is opened the user can add parts to the Purchase Order.
On the Parts Tab on the Purchase Order a user can enter the Part Number, Warehouse and Quantity of the Part Number they want to order.
The Cost will be defaulted from the Part Number record.
The Open Orders Tab on the Inquiry Tab of the Part Number will reflect details about the open Purchase Order for the Part
The Dates Tab will show the last time the Part was ordered.
Adding Backorder Parts to a Purchase Order
Once a Parts Purchase Order is opened the user can add parts that were backordered on a Work Order to the Purchase Order.
On the Back Order Tab of an Open Purchase Order the user can select the Parts that have been backordered and then choose the Order button which will add the Part to the open Purchase Order.
If the Part Number in the Back Order Tab has an Asterisk next to it that means the Part is on other Open Purchase Orders and you can add the Backorder part to that Purchase Order if you wish.
The Tooltip will show you other Purchase Orders it is currently on.
The Additional Stock PO’s field will appear when you select one of these parts to allow you to add it to that Purchase Order. If this option is selected, additional quantity is not ordered, it is assumed that you will be using the quantity you are ordering on that Purchase Order to fill the Backorder.
Removing a from a Purchase Order
If you are working on an Open Purchase Order and choose not to order the part or find out from the Vendor, you are not going to get the part in you can select the Part Number on the Parts Tab and remove it from the Purchase Order.
If the Part Number is a backordered part, it will add it back to the Back Order Tab.
Receiving Parts
When a Purchase Order has been created in Softbase and the dealer receives the inventory from the Vendor they must receive the parts in order to update the On Hand Quantity.
This can be done by using the Purchase Order feature.
PO Parts Receiving
On the Parts Tab of the Purchase Order the user can select the; Recv button to open up the PO Parts Receive window.
This allows the user to select and view all parts that haven’t been received and select them using the checkbox to receive.
If the user is receiving less than what is ordered of the part, then they can click into the Qty to Recv field and edit that number.
The quantity can only be equal to or less than what is on the Purchase Order. In order to receive an overage of the part you would have to update the Quantity order on the Purchase Order.
In the Selection Options dropdown, there is an All option that allows the user to select all parts to be received.
When ready to receive the parts, the user will choose the Receive button and that will process the receiving and update the On Hand Quantity of the parts with the amount that is being received.
When all parts on a purchase order have been received the Purchase Order will be set to a status of closed.
The Movement Tab and Order History Tab on the Inquiry Tab of the Part Number will reflect details about the receiving.
The Dates Tab will show the last time the Part was received.
PO Parts Receiving for Backordered Parts
If the Parts that are being received are on back order to an Open Work Order when they are received the user will be able to print the Parts Receiving Slip that will provide details about what Work Orders the Parts should be filled to.
This process is done as the Parts should not be placed on the shelf for stock but go to the area reserved for filling parts to a Work Order or Service Van that will be performing the services.
For Backordered parts, the On Hand of the Part Number will not be increased; rather the Part that was backordered on the Work Order will now indicate the Part isn’t backordered and it is filled on the Work Order.
Work Orders with Backordered Parts can’t be invoiced until the Backorder was filled or removed from the Work Order.
Viewing Vendor and Internal Purchase Order Documents
In the Purchase Order Window the user has the choice to view and print the Vendor or Internal Purchase Order. The differences are outlined below;
Vendor Purchase
Intended to be used to provide to the Vendor and show Part Number and Quantity information.
Internal Purchase Order
Contains information for the dealer such as bin location and receiving information if the PO Print Options is set to print the Received Totals and Dates
This is what can be used as a report to show when and how many of a part was received on the Purchase Order.
This can be used as a Suggested Purchase Order document to make decisions about what to order and see demand history if the PO Print Options is selected to print that information.
Transferring Parts
Once Parts are set up in Warehouses in Softbase they can be transferred from one warehouse to another using multiple features in the system.
Warehouse to Warehouse Transfer
When a user needs to transfer a single or few parts from one warehouse to another, they can use the Transfer button on the Toolbar on the Parts Window.
Enter the Part Number in the Warehouse you want to transfer the part from then select the To Warehouse and the quantity that you want to transfer and select the Transfer button. This will transfer the quantity from the From Warehouse to the To Warehouse.
If the Part Number doesn't exist in the To Warehouse the user will see a warning message that will notify them the Part will be created in the To Warehouse.
The From Warehouse must have enough quantity in the On Hand Quantity to fill the amount requested to transfer to the To Warehouse.
When transferring the parts and exiting the Warehouse to Warehouse Transfer Window the user will be able to print the report automatically. They can also print it from the Toolbar menu.
A previous Transfer can be pulled up by changing the ID to the ID used on the previous Transfer. That is the number value that is located next to the comments at the bottom of the window.
The Transfer From and Transfer To Tabs on the Inquiry Tab of the Parts record will be updated in both the To and From Warehouses to reflect the transfer of the part. The Movement tab will also be updated as well.
The Demand and Bin Trips will also be updated in the From Warehouse to track its demand.
Warehouse / Service Van Replenishment
The Replenishment Button on the Toolbar on the Part Number allows the user to select Warehouses setup as Service Vans or Consignments to be replenished from Warehouses that are setup to replenish them.
Setup
The Service Van or Consignment Warehouse would be set up with up to 4 Warehouses that can be used to replenish the inventory of parts in the Service Van or Consignment Warehouse. This setup is done on the Warehouse Setup of the Service Van or Consignment location.
When setting up parts in the Service Van or Consignment locations you would use the Van Minimum Quantity and Van Maximum Quantity on the Pricing/Qty Tab on the Parts Window to indicate the stocking level of the part on the Service Van or Consignment location.
Replenishing Parts
When the Replenishment Button is selected and opens up the Service Van Replenishment Window you will select the Branch that the Service Vans or Consignment Locations are located under.
The user can select a single or multiple Service Vans or Consignment Locations to replenish the parts.
Gather Parts in the Warehouse(s) to be replenished where the On Hand Quantity is less than the Van Minimum Quantity
Determine the quantity needed of the part by subtracting the Van Maximum Qty from the On Hand Quantity for parts where the On Hand Quantity is less than the Van Minimum Quantity.
Check the Parts On Hand Quantity in the Warehouse(s) that can replenish the Service Van or Consignment to see if there is enough Quantity On Hand to fill the needed Quantity.
If multiple Warehouses are set up to be able to replenish a Service Van or Consignment Location then attempt to fill the parts from the Warehouses in order of Top to Bottom.
If the needed quantity of the Part in the Service Van or Consignment can be filled then update the On Hand Quantity in both Warehouses otherwise do not.
If FIFO Inventory is turned on in the Warehouses involved in the replenishment then the updates will occur accordingly in the FIFO section of the Part Numbers in the To and From Warehouses.
Printing Reports
When a Service Van Replenishment is ran there are 3 reports that can be printed;
Consolidated Pick List
This pick list will show all parts from the Warehouse that is filling the Service Van or Consignment location and the current on hand quantity and how many parts need to be picked regardless of how many Service Vans or Consignment Locations are being filled.
Distributed Pick List
This pick list is the same as the Consolidated except for it is for a single Service Van or Consignment location that will be filled from the Source Warehouse.
For each Service Van or Consignment location filled a Distributed Pick List will be printed.
Still Needed List
This list will print to show a consolidated view of all parts in all Service Vans or Consignment Locations that have parts that needed to be filled but can’t be filled from the Source Warehouse(s)
Copy Warehouse
The Copy Warehouse Button on the Toolbar on the Part Number allows users to copy all parts from one warehouse to another. This may be used when a new warehouse is set up or when a warehouse may be closed down.
When the user chooses the Copy Warehouse button on the Toolbar on the Parts Window it will call the Copy Warehouse Window.
On the Window the user will choose the Source and Destination Warehouses and will get a count of the total part numbers under each Warehouse.
To Copy all the Parts from one warehouse to another choose the Copy button on the Toolbar after you have selected the Source and Destination Warehouse. The following options are available to determine how the parts will be copied;
Copy Options
This allows you to determine if you want to copy and move the Quantity on Hand of a Part from the Source Warehouse to the Destination Warehouse.
If the option; With 0 On Hand Qty is chosen then no Quantity on Hand will be moved.
If the option; Transfer On Hand Quantity is choosent then the Quantity on Hand will be moved to the part in the Destination Warehouse.
If the Part exists in the Destination Warehouse the On Hand Quantity will be added to the On Hand Quantity of the Part.
If the Part doesn’t exist it will be created and the On hand Quantity will be moved to the new part.
Copy Service Van Min and Max
This option determines if the Van Minimum Quantity and Van Maximum Quantity are copied from the Source to Destination Part Number
Update Pricing for Existing Items
This option will update the pricing of parts in the Destination warehouse to match the Pricing of the Parts in the Source Warehouse if selected.
Move Demand History
This option will move the Parts Demand, Sales, Bin Trips and Lost Sales of the parts from the Source to Destination Warehouse.
If the Part already exists in the Destination Warehouse the Parts Demand, Sales, Lost Sales and Bin Trips will be added to the existing values of the parts in the Destination warehouse.
Selling Parts
When parts are needed to perform services on equipment or when a customer wants to purchase parts over the counter the user in Softbase can add the Parts Inventory to a Work Order in order to sell the part.
Parts can be added to the Parts Tab of an Open Work Order or Open Work Order Quote in order to sell or quote them to a customer.
Adding a Part to an Open Work Order will remove the quantity added to the Work Order from the On Hand Quantity of the Part
Adding a Part to an Open Work Order Quote will not remove the quantity added to the Work Order from the OnHand Quantity of the Part
The On Hand Quantity will be updated when turning a Quote into an Open Work Order.
Additional updates to the Part Number that are done when adding the Part to an Open Work Order or turning a Quote into an Open Work Order;
The Cost of the Part being sold will either be the Cost or from the newest record in the FIFO section of the part if FIFO Inventory Costing is used for the part in the Warehouse it was added to the Work Order from.
The selling price of the part on the Work Order is calculated by looking up the Parts Pricing Setup on the Bill To Customer on the Work Order and looking at the Pricing levels of the part being sold.
The Parts Demand and Bin Trips will be updated
Parts Demand is the total quantity sold
Bin Trips is recorded as 1 for each time it was added to the Work order.
The Parts Sales are updated when the Work Order is Invoiced.
The Last Pick and Last Demand values are updated on the Dates Tab of the Part Number
The Movement Tab on the Inquiry Tab of the Part Number is updated.
When adding a Part Number to the Parts Tab of an Open Work Order or turn a Work Order Quote into an Open Work Order and the Quantity attempted to be added is more than the On Hand Quantity a prompt will be called to allow a user to backorder the part.
Tracking Parts Movement
Users can use the Inquiry Tab on the Part Number to track and see all movements and other key information about a part.
When in the Parts Window and looking at a Part Number choose the Inquiry Tab for all the below options that are available to view information about the movement and other information of a part;
Warehouses
This will show information about the part in all warehouses that it exists in.
Cross Ref
This will show cross references setup for the Part Number
BO’s
This will show information about backorders for the Part Number
Order History
This will show information about the parts when it was received on Parts Purchase Orders
Open Orders
This will show the Open Purchase Orders the Part is currently on.
Trans To
This will show information about the part when it was used in the From Warehouse in a Parts Transer
Trans From
This will show information about the part when it was used in the To Warehouse in a Parts Transfer
Replen To
This will show information about the part when it was used in the To Warehouse in a Service Van Replenishment.
Replen From
This will show information about the part when it was used in the From Warehouse in a Service Van Replenishment
Sales
This will show information about the part when it was invoiced on a Work Order
Movement
This will show information about the part anytime the On Hand Quantity of the part was changed.
Parts Bin Locations
Within a Warehouse, parts should be located in Bin Locations that identify where the parts are physically located at. This allows users to efficiently look up where the part is in order to pick it to sell on a work order, count as part of a cycle count or pull it to add to a parts transfer.
Setup of Bin Locations.
The user can set the Bin Locations of a Part on the Bins Tab of the Parts Window
The user has the option to identify 5 different bin locations where a part can be located within a Warehouse. The Primary Bin and 4 additional alternate locations.
When setting up a new Part Number the Bin Location is defaulted to New unless the user overrides it so it can be easily identified to set the bin location as needed.
On Hand Quantity of the Part is still stored at the Warehouse level regardless of how many bin locations are set up for the part.
On the Bins Tab you can also see a view of all other parts that have the same Primary Bin Location in the Warehouse.
Mass Change of Bin Locations
On the Bins Tab of the Parts Window there is a Change Bin Button  that allows the user to perform a mass change of all parts in a Bin Location.
When the Change Bin button is pressed it will ask the user what the new Bin Location you want to use is and then it will change all parts that have a matching Bin Location of the current part you are viewing to the new Bin Location you identified.
Bin Location Reports
In the Parts section of the Reports Tab you can find a few different reports that may be beneficial when when looking at Parts and Bin Locations;
Parts On Hand No Bin
Identifies parts that are setup in Softbase with an On Hand Quantity that have no Primary Bin Location identified.
Parts By Bin
Allows a user to run a report and see all parts grouped together by a bin location. The user can select a specific bin location or view all.
Parts Cycle Counts and Physical Inventories
In order to keep accurate counts of the parts inventory in a warehouse the Softbase system allows you to perform a Physical Inventory or Cycle count of Parts. This allows you to identify parts in a warehouse, print out count sheets, count the parts and then enter the counts into the system and update the on hand quantity of the parts.
Benefits of counting inventory
Counting your Parts Inventory on a recurring basis provides a dealer with multiples benefits including;
Physical and GL Parts Inventory
Counting parts on a regular basis helps identify any issues that may come up between the dollar amount between your physical inventory and GL Parts Inventory so there are no surprises.
Accurate Inventory Counts in the system
Allows users to accurately see what the on hand quantity of the part is making selling parts, picking parts and transferring parts an efficient process.
Maintaining a healthy inventory
Having an accurate inventory count allows you to review demand and usage of parts and help ensure that you aren’t overstocking or understocking parts which keeps you with a healthy parts inventory to provide service for your customers.
Cycle Counts vs. Physical Inventory
The Softabse System handles a Cycle Count and Physical Inventory in the same program by going to the Inventory Count Button  on the Parts Window.
Generally speaking both terms refer to counting parts in a physical inventory and updating the on hand quantity.
A Physical Inventory typically refers to the process of counting all parts in a specific warehouse. This process may be done once a year and involve a longer timeframe to count the parts.
A Cycle Count typically refers to counting a subset of the parts in a specific warehouse, usually by a group of bins. These counts are usually done more often as they can be done quicker. You may choose to count your fast moving parts and bin location say 4 times a year as you are picking parts more often than slower moving parts.
Creating a Cycle Count or Physical Inventory
When the user is in the Parts Window choose the Inventory Count Button and this will open up the Physical Parts Inventory Process window.
Enter an Inventory ID value that doesn’t exist to create a new Inventory count record. Using a Description and Date is generally an idea to keep the inventory ids unique.
Select the Warehouse you want to count the parts in. You can select up to 3 Warehouses to count at the same time.
Select the options you want to use to select what parts can be included in the count.
When ready to capture the current on hand quantity of the parts and count the parts choose the capture button after selecting all the options you want.
It is important to know that from the time you capture the parts to the time you enter the counts and post the Inventory Count you should not be picking parts to add to Work Orders that you are counting unless you have a process in place to handle that. The count that you enter and post in the Inventory Count is what the On Hand Quantity will be updated to so any updates you make after you count the parts would not be considered in the update to On Hand Quantity.
After the Inventory ID has been captured you can print the count sheets out that will allow the users to see the parts they should be counting and the bin locations of where those parts are located at. Users can write the counted quantities on the parts and return to users that will enter the counts in the Inventory ID
Counting Parts
When counting parts you have two options to use, Single Bin Entry or Multiple Bin Entry.
If the Multiple Bin Location Entry Method is selected you must use Multiple Bin Entry, otherwise you would be using the Single Bin Entry.
Single Bin Entry allows you to see all the parts captured and enter the count and on the Single Bin Entry Tab. In this method you only enter the quantity on hand once for each part.
Multiple Bin Entry will display a line for a part in each of the 5 bins that the par may be located in. When counting the parts you would enter the count of the part number found in each bin and when you go to view the variances it will subtotal the on hand quantity of the part in the warehouse for all bins you counted for that part.
Variance Reports
Once the user(s) have counted all the parts they can go back to the Capture/Setup Tab on the Physical Parts Inventory Process window and view the counts vs. the on hand quantity captured.
From that list the user can choose the following options to print reports to help audit the parts count and determine if updates are needed to be made before posting the final counts;
Not Counted
This report will show all parts that were on the Inventory ID but not counted.
Count Variance
This report will show all parts on the Inventory id and the difference between the counted quantity and the on hand quantity at the time the Inventory ID was captured.
Value Variance
This report will show all parts on the Inventory ID and the dollar amount difference based on the cost of part multiplied by the counted quantity of the part and the on hand quantity of the part captured on the Inventory ID.
Finalizing the Inventory Count
When the user is ready to finalize and post the final counted quantities of the parts on the Inventory ID ensure that you have reviewed the reports and are good with the on hand quantity updates that will be made and the value that will be impacted in the physical inventory.
When ready choose the Post button on the Capture/Setup tab and this will update the on hand quantity of the parts on the Inventory ID with the counted quantities.
This will update the Last Counted field on the Dates Tab and the Movement Tab on the Part Number.
Ensure to save a copy of the Value Variance report as you will want to work with your Accounting Team to determine if inventory adjustments to the GL should be made based on the counts.
An Inventory valuation can also be run before and after for record keeping, especially if the
count is for the entire parts inventory in a Warehouse.
For more details on the Inventory Count option in Softbase please refer to the following Knowledge Base Article; https://support.softbasedev.com/portal/en/kb/articles/physical-inventory
Parts Price Files
The Softbase system has the ability to allow dealers to import a price file into Softbase that they can use to update parts costing and pricing from as well as quickly create parts from the price file. The Price Files should be obtained from the vendor by the dealer.
Softbase is aware of certain vendor price file formats and can easily import those formats that we have been made aware of from Dealers. We are also able to review new formats provided from vendors via the dealers to add to that list as well.
For Vendors that we may not have created an import for we do allow a standard price file format import that the user can take a vendor price file and format it in a standard file format that the dealer can then use to import into Softbase.
Importing Price Files
To Import a Price File in Softbase select the Price Files Button on the Parts Window and this will load the OEM Price File Load Window.
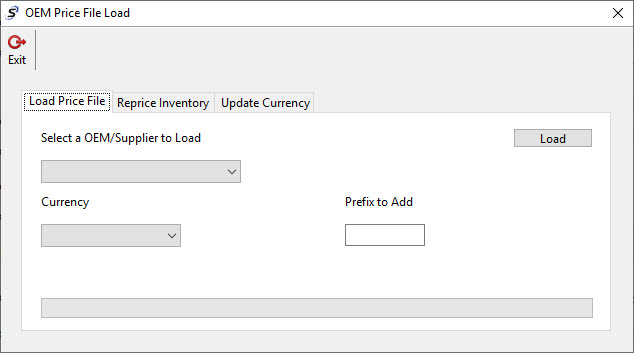
On the Load Price File Tab select the Vendor/Supplier of the Price File you wish to import. If you don’t see your Vendor there then you can use the Standard option and import the price file if you have formatted it correctly.
When you select the Standard Option you will provide a name of the supplier you are importing.
The following article link outlines details on the Standard Price File Format
You have options to select a currency setup for the Price File if parts could be purchased in different currencies. You can also add a Prefix or MFG Code that will be used when adding parts from the Price File.
Choose the Load button when and select the price file from your local machine you want to import.
Depending on how large the price file is and how good the network connection from the Softbase Machine to the Server is this could take several minutes to hours. It is recommended to load large files on off business hours to not impact other users.
Setting up Parts Groups with Price Files
Once you have imported a Price File you can associate the Price File Supplier with a Parts Group so that you can use that Price File to update Parts Cost and Prices from the Price File or create new Parts in Warehouses quickly from the Price File.
On the Groups Tab from the Setup Button on the Parts Window, select the Parts Group and go to the Re-Price Tab.
On the Re-Price Tab select the Supplier you imported the Price File for to associate it with the Parts Group.
You can select the Parts Group as the default Group that will be used when creating a part from the Price File.
You also have options to determine whether the Cost or List shouldn’t be updated when updating Cost and Prices from the Parts Price Files.
Adding Parts Inventory records from the Price File
After having imported the Price File and associating the Parts Group with the Price File the user can create parts in the Parts Window from the Price File.
When typing a new Part Number in the Parts Window or on the Parts Tab in the Invoicing Window and the part doesn’t exist in the Parts Inventory and is found on a Price File, a disc button  will appear and allow you to select that to see what Price File it is found on.
The user can select the part number from there and then default all the fields on the Parts record and create it quickly.
Repricing Parts Inventory from a Price File
The Vendor will generally provide updating costing and pricing of their parts in an updated price file. When this is provided and the new file is imported into Softbase the user can then decide to update all parts that are setup in Softbase that match a part on the Price File with an updated cost and prices.
On the Reprice Inventory Tab of the OEM Price File Load Window that is called from the Price Files button on the Parts Window the user can select the Supplier Price File they want to run to update pricing of Parts in Softbase.
They have options to use the Part Number without dashes as the lookup value if they would like or don’t update cost on parts.
When they select the supplier and choose the Reprice button it will search for all parts in the Parts Groups that are associated with the Price File and match the Part Number and update the Cost and Prices with information from the Price File they had imported.
Viewing and Editing Parts on Price Files
The user can choose the File Menu button on the Parts Window and choose the Edit Price Files option to pull up the Parts Price Files Setup Window.
The user can select a Price File Supplier and enter the part number to see if it had been imported and the current values of that imported value. From there the user can view or update about that part on the imported price file.
This edit is not updating the Part Number in Softbase but rather the Part Price File record that can be used to create or update the Parts costs and prices for Parts already set up in Softbase.
Parts Aliases
Softbase allows users to set up Aliases on Part Numbers that can be used to allow a dealer to stock and track all information of a Part Number as one value but then sell the part or order the part as a different value that the Customer or Vendor may know or prefer to see.
Part Alias Types
Was this article helpful?
That’s Great!
Thank you for your feedback
Sorry! We couldn't be helpful
Thank you for your feedback
Feedback sent
We appreciate your effort and will try to fix the article