1. In the Administration section click the Department program and click "Add Department".

2. Utilize the drop-down menu to select the correct Branch the new department needs to be added to.

3. Click the Department field and enter the department number, usually a two-digit identifier. For example, the Used Equipment department for Branch 1 might be department 30.

4. Click the "Title " field and enter the new department's name. Example- Used Equipment.

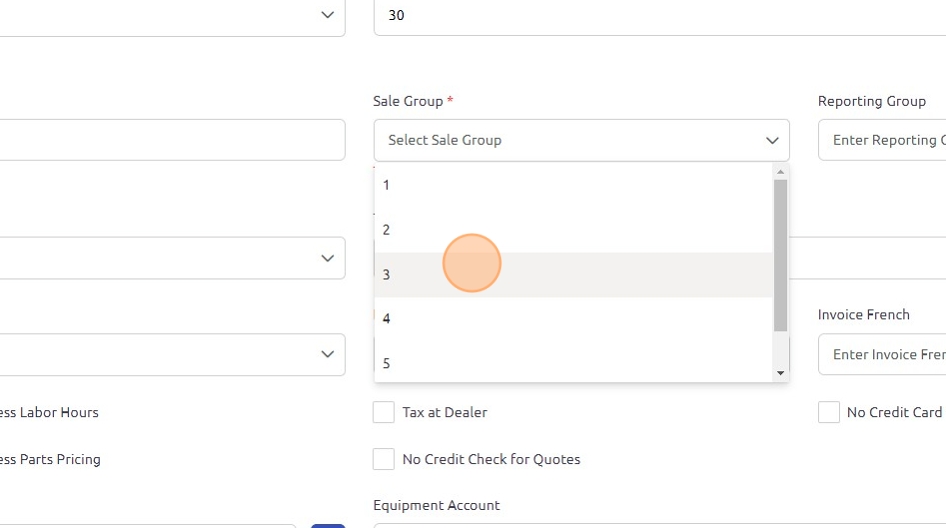
5. Assign the correct Sale Group, which is set up under the company information. These groups determine which departments are associated with these groups for Sales Commissions.
6. Assign the correct Invoice Type that coincides with the department.

7. Click the "Invoice Name" field and enter what will appear on the top of documents from this department.

8. Select the correct account type to attach to the department. For example, Used Equipment would have an Equipment Account, while Road Service would have a Labor Account attached.

9. Under the "Additional" tab a default departmental charge can be added.
Enter the Misc Description: Enter the description of the miscellaneous charge that will appear on the invoices.
Percentage: Input the percentage desired that will be calculated on the total of the document unless other wise specified.
Minimum and Maximum Amount: To use a flat rate amount, input the same value for both the minimum and maximum amount fields. Otherwise, use these fields to set parameters for the total calculated by the percentage entry.
Auto Add: Setting this check box to true will automatically add the miscellaneous charge when a document is opened to this department. If Auto Add is not checked, these charges can be added by clicking the "Add Dept. Charges" from the document.
The check boxes under these field are optional and can be utilized to specify where and how these departmental charges are added.

10. Under the Docs/Dates tab:
Setup Next Invoice Number:
- Recommended format: branch/department/remaining characters, total of 8 digits.
- Example: 13000001 (branch 1, department 30).
Setup Next Quote Number:
- Recommended format: 9/department/remaining characters, total of 8 digits.
- Example: 93000001 (quote 9, department 30).
Enter Next PO #:
- Recommended format: 8/department/remaining characters, total of 8 digits.
- Example: 83000001 (PO 8, department 30).
Enter Next Rental Contract #:
- Define the format or numbering system for rental contracts (Example: 1000).
Enter Quote Expiration Days:
- Specify the number of days a quote remains valid.
Set Up Transaction Date Range:
- Set the date range to allow accounting postings for this department, to apply click "Save".
- Note, the set button will apply the same date range to all departments, after clicking "Save".

11. Under the Rental/Parts tab, settings are specific to Rental and Parts departments. Key options include:
Auto Create Inspection Work Order:
- Automatically generates an internal Rental Inspection Work Order when a rental is returned and the rental invoice is closed.
Certificate of Insurance Expiration Auto Charge:
- Automatically applies a charge if the customer's Certificate of Insurance (CIO) has expired.
Rental Periods:
- Define the rental periods available for your department (e.g., daily, weekly, 4-week, monthly).
Parts Routing Priorities:
- Set the default priority order for routing parts.

12. Under the Quotes tab, you can enter specific terms and conditions for quotes generated for this department. These terms will automatically populate on all quotes sent, ensuring consistency in communication with customers.

13. Under the Invoice tab, you can enter specific terms and conditions that will automatically populate on all invoices and quotes sent to the customer, ensuring consistent billing information and policies.

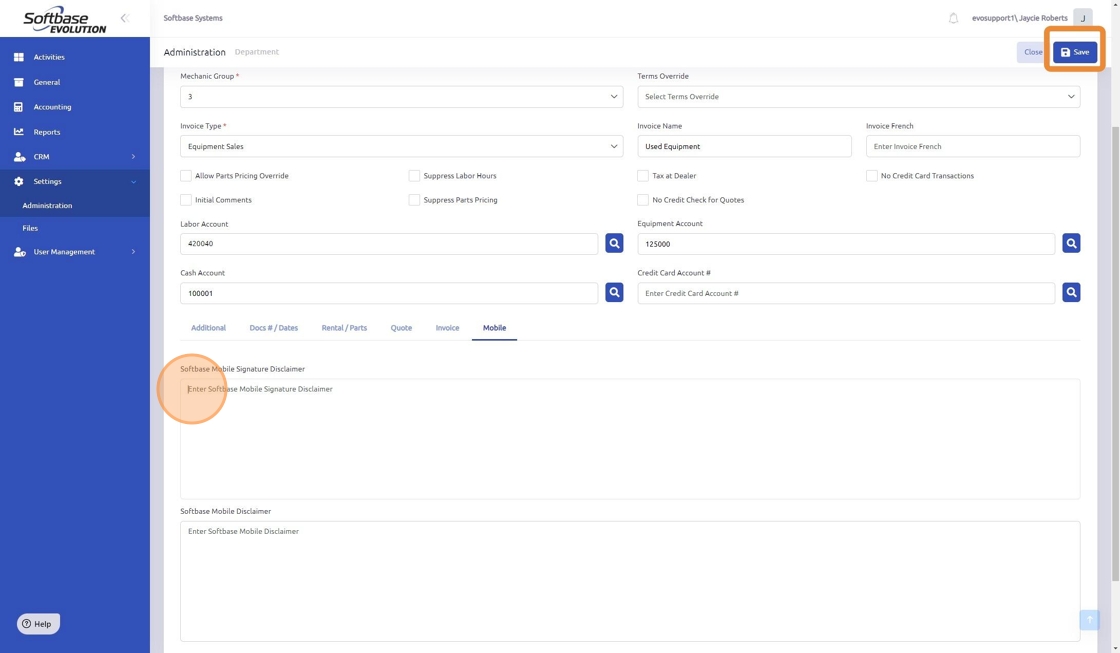
14. Under the Mobile tab, you can enter specific terms and conditions that will automatically populate on any mobile signatures and/or recaps, ensuring clear communication during mobile transactions.
Once all information is entered into the new department click "Save."
- Softbase Mobile Signature Disclaimer - This field will be used/printed on the Recap when the Multi Signature feature is used on the Softbase Service Mobile app and when there is no value in the Softbase Mobile Disclaimer field.
- Softbase Mobile Disclaimer - This field will be used/printed on the Recap in the Softbase Service Mobile app.
Was this article helpful?
That’s Great!
Thank you for your feedback
Sorry! We couldn't be helpful
Thank you for your feedback
Feedback sent
We appreciate your effort and will try to fix the article