The Customer record is added and updated from the Softbase main menu then selecting the Accounting tab and then select Customers
To retrieve an existing customer account simply enter the account number. If you need to search for the account, click the magnifying glass to open the search window. Once you begin typing a name search the results pane will begin showing you a list of results. Double click on the appropriate account to return to the customer window. (*Note: In the search window you can you can use the percent (%) sign as a wild card to help filter results)
Adding a new customer account:
If you are allowing the system to generate the customer account numbers simply click the NEXT button at the top of the customer window. This will retrieve the next available number. If you are using a different numbering structure simply type in the new customer account number into the Customer # field.
Field List:
Bill To # - This can be the same account number but if there is a different account such as a corporate account simply enter that other account number into the Bill To # field.
Company Name - This is the account name usually the company name.
Old/Alt Company Name - If the company name has changed and you want to retain the previous name or there is an alternate name you would like to use.
Company Sub Name - If the account has a sub name you can enter it here.
Address - Enter the physical address here.
PO Box - If they also have a PO Box enter it here
Both - This check box is located to the right of the Address and PO Box fields. Normally without this check box selected, if there is a PO Box in the Bill To Customer setup, that is used instead of a street address. HOWEVER, if there is no PO Box present, then street address is printed on the Invoice on the Bill To side. (The Ship To will always use the street address field regardless)
City - If you enter the Zip/Postal Code first, the City & State will
State - populate but it you prefer to manually enter them individually feel
Zip / Postal Code - free do so
Country - Select the appropriate country
Inactive - If you mark the Inactive flag the customer account will be considered inactive at that moment and you will no longer be able to open work orders to the customer account. If you attempt to open a work order to an inactive customer account you will be prompted with a message stating The selected billing customer is marked as inactive. Unable to open this document.
Available Ship To’s - if there are multiple Ship To accounts for a particular Bill To account the available Ship To’s will show up in the drop down field
# Quick Search - If you are using a customer numbering system where you use part of the customer name as a prefix you can enter the first characters into this field. A list will begin to populate showing what account numbers have already been used to help you determine what the next number should be.
General tab
Map Location - This field is strictly for your reference. The original purpose for this field was to store the keymap (map book) page.
Parent Company - If there is a Parent Company name you can enter it here.
R.F.C. - Residential Funding of Canada. This is a memo field that can be used to identify a funding source.
OB10 Customer # - If you need invoices for your customer to be included in the OB10 export, enter the OB10 customer number here.
**OB10 is an internet based network run by a third party vendor called OB10 Limited which facilitates electronic transmission of invoices to buyer's Accounts Payable System. OB10 allows you to upload invoice data directly from your billing systems, gives you the ability to track invoice delivery and completely eliminates the need for paper invoices. OB10 needs only access to the Internet and does not require any special hardware or software to use.
*If using OB10 invoicing there are fields under the Parts, Labor, Misc, Rental, and Equipment tabs labeled ‘Cust PO Line #’ where you can enter the line number from the customer’s PO for the items they are purchasing.
TMHU Customer # - If you need invoices for your customers to be included in the TMHU export, enter the TMHU customer number here.
Final Invoice Copies - If you enter a value here, this is how many printed copies you will get when the invoice is printed from the Print Final window.
Branch - assign the customer to a primary branch for reporting.
Preferred Ship Via - select the customer’s r=referred shipping method for the drop-down.
Bill To Over Ride - if checked for a ship-to the bill-to will be the ship-to address
Internal Customer - This identifies if the customer is an internal customer. Unchecked is a trade customer.
Vendor # - If the customer is also a Vendor you can enter the Vendor number here.
Territory # - If you have identified territories enter the territory value in this field.
Alt Customer # - if the customer has an additional customer in Softbase enter it here.
Resale # - Enter the customer’s resale certificate number in this field.
Exp Date - Enter the customer’s resale certificate expiration date in this field.
On File - Check this field if you have a copy of the certificate on file.
MFG Permit # - Enter the customer’s manufacturing permit number in this field.
Exp Date - Enter the permit expiration date in this field.
On File - Check this field if you have a copy of the permit on file.
Insurance Certificate # - Enter the customer’s insurance certificate number in this field. This would be for rental invoices.
Recv Date - Enter the date you received the certificate in this field.
On File - Check this field if you have a copy of the certificate on file.
Exp Date - Enter the certificate expiration date in this field.
Reference # 1 - If you received references you can enter the name in this field.
Reference # 2 - You can enter the name of a second reference in this field.
Currency Type - If the customer deals in a foreign currency select the currency type form the drop-down. The drop-down is a list of currency types you have created.
Phone Numbers Tab
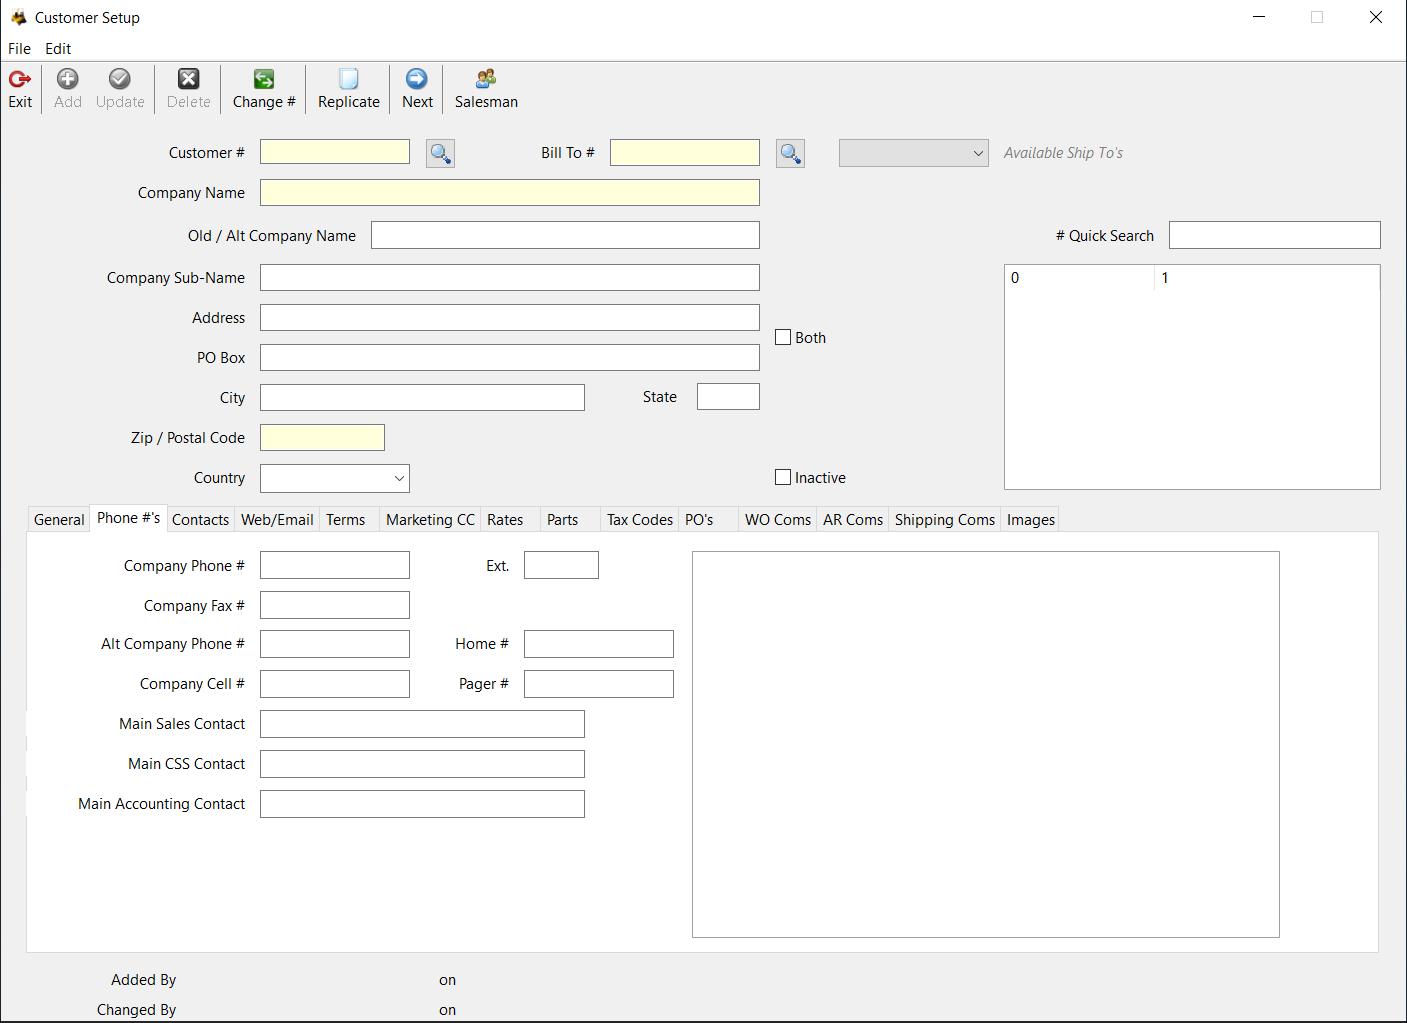
Company Phone # - main phone number for the customer.
Ext. - Enter the extension number when calling the Company Phone #.
Company Fax # - fax number for the customer.
Alt Company Phone # - if there is a secondary phone number enter it here.
Home # - enter the home phone number if you have it.
Company Cell # - enter the primary cell phone number here.
Pager # - enter the pager number if you have it.
Main Sales Contact - enter the name of the main sales contact.
Main CSS Contact - enter the name of the person that is the main sales and service contact.
Main Accounting Contact - enter the name of the main accounting contact.
Contacts Tab
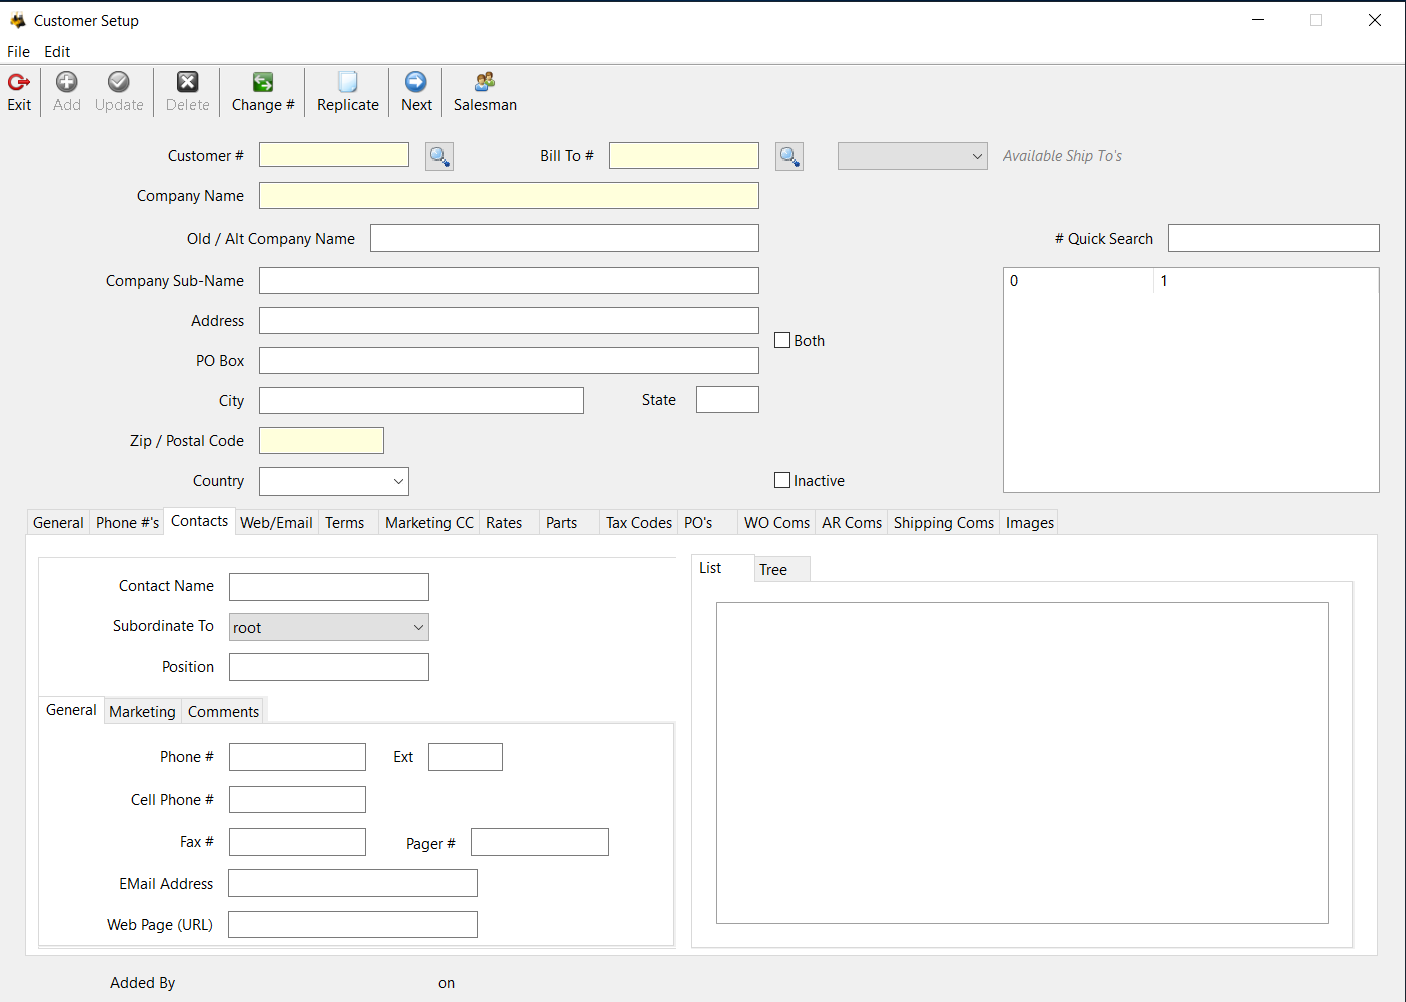
Contact Name - enter the contact’s name in this field.
Subordinate To - select the person that the contact reports to. The top level contact will have the value of root.
Position - enter the contact’s position in their company
General Sub Tab
Phone # - enter the phone number of the contact.
Ext. - enter the extension of the contact.
Cell Phone # - enter the contact’s phone number.
Fax # - enter the fax number for the contact.
Pager # - enter the pager number for the contact.
Email Address - enter the contact’s email address.
Web Page (URL) - enter the webpage of the contact.
Marketing Sub Tab
Contact For:
You can check if the contact is a contact for any of the six defined types.
Mailing List - check this box if the customer is on a mailing list.
Mailing Category - select the mailing categories the contact belongs to.
Available Categories - a list of all available mailing categories.
Comments Sub Tab
Enter any comments that are applicable to the contact.
List - this section will list all of the contacts entered for the customer.
Tree - this section will show all contacts entered for the customer in a treeview format.
Web/Email Tab
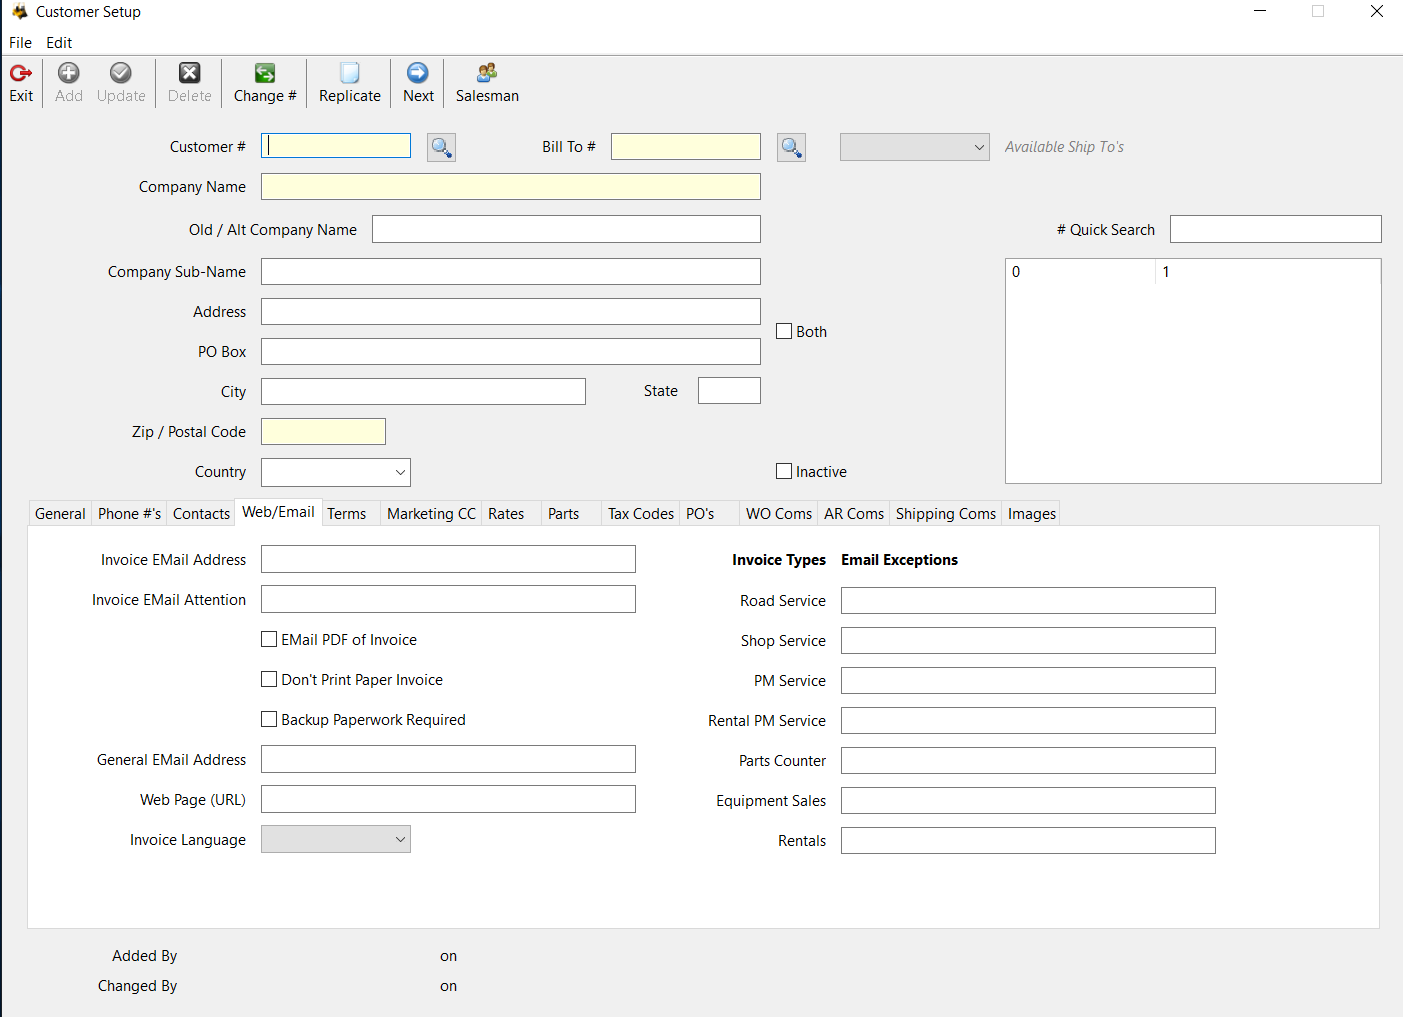
Invoice EMail Address - enter the email address that invoices will be sent to.
Invoice EMail Attention - enter the Attention To name that will be used when emailing invoices.
Email PDF of Invoice - does the customer get a copy of their invoice emailed as a PDF
Don’t Print Paper Invoice - Check this box if you don;t want a paper copy of the invoice to print.
Backup Paperwork Required - does the customer require backup paperwork to be provided with their invoices
General EMail Address - customer’s generic email address
Web Page (URL) - enter the customer’s web page in this field.
Invoice Language - select the language the invoices will print in from the drop-down.
Invoice Types/Email Exceptions
Enter any additional email addresses, for the different invoice types, that you would like to send invoices to. You must have the Invoice EMail Address populated to also send to these email addresses.
Terms Tab
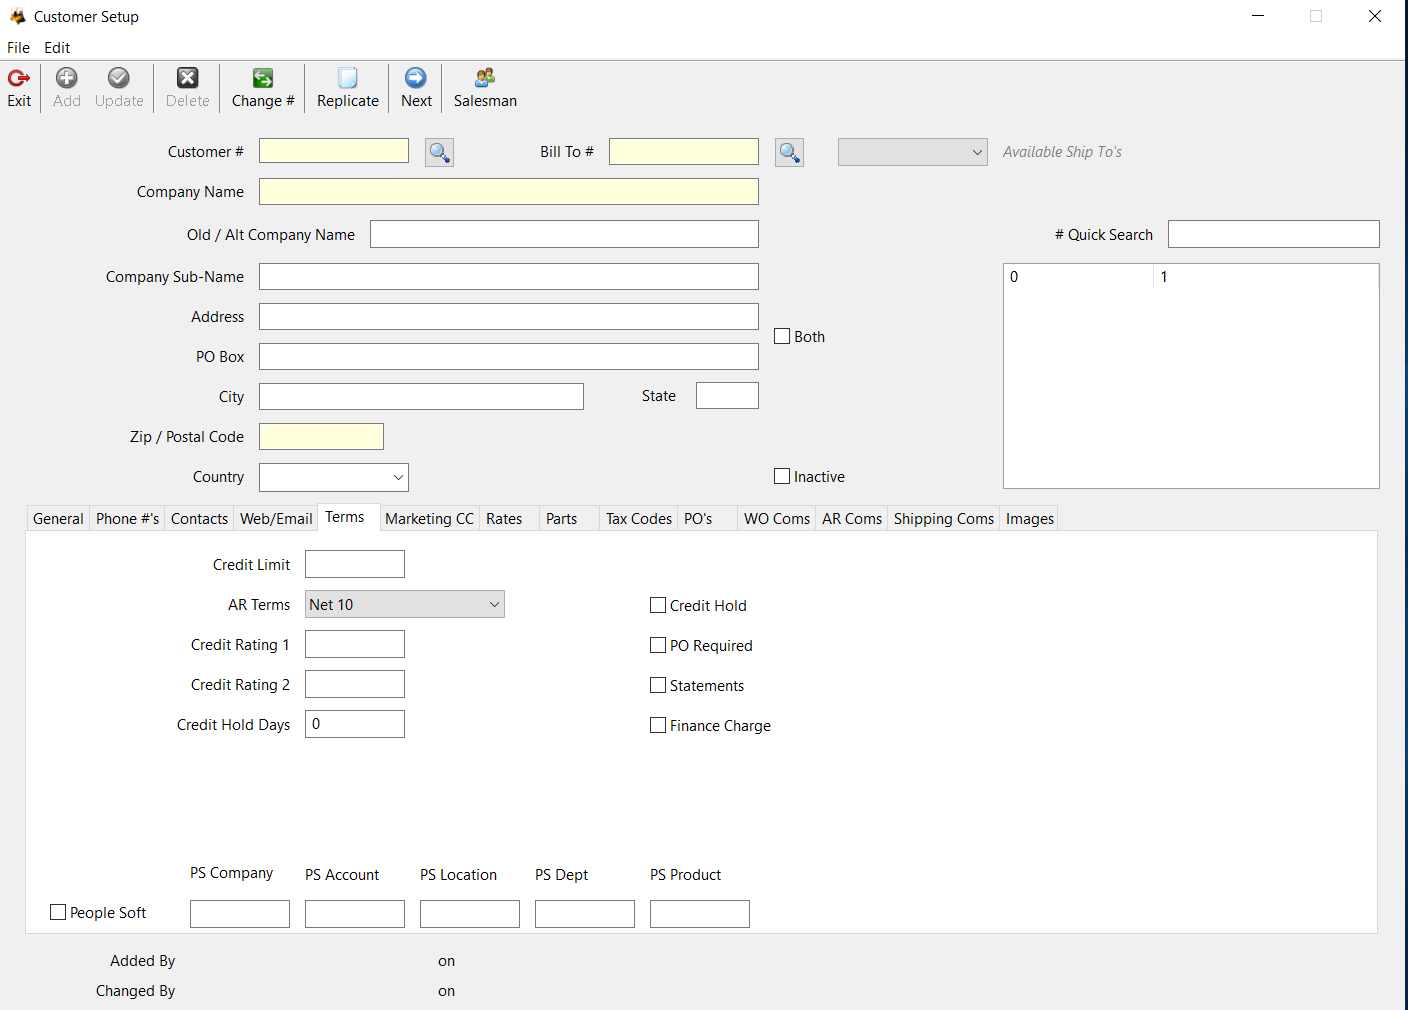
Credit Limit - enter the dollar value of the customer’s credit limit.
AR Terms - select the appropriate invoice terms from the drop-down.
Credit Rating 1 - enter the customer's credit score in this field.
Credit Rating 2 - if you have a credit score form more than one source enter the second value in this field.
Credit Hold Days - the number of days an invoice has to be past due for the customer to be on credit hold
Credit Hold - if this field is checked the customer is on credit hold.
PO Required - check this field if the customer requires a PO when invoicing an order.
Statements - does the customer receive a statement
Finance Charge - check this box if the customer is subject to finance charges.
Marketing Tab
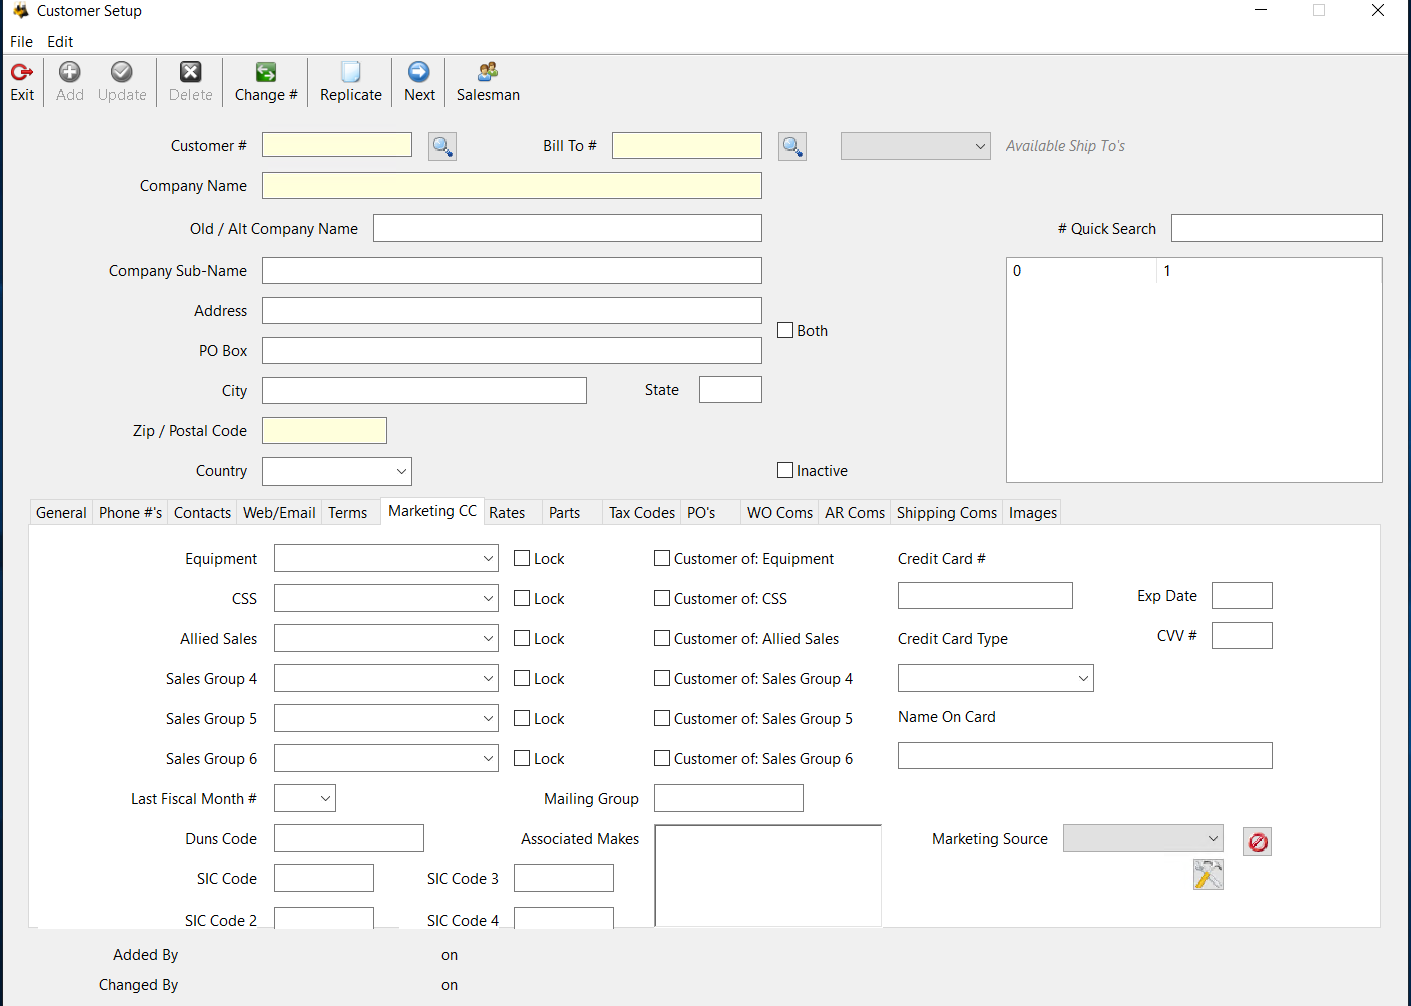
This tab uses the Sale Group Titles that are entered in the Company record, Marketing tab.
The column of drop-downs is where a default salesperson can be defined for each Sale Group.
The lock checkbox defines if the salesperson can be overridden.
Last Fiscal Month - When is the customer's fiscal year end.
DUNS Code - enter the customer’s DUNS code if it is known.
SIC Code - enter the customer’s SIC code if it is known.
SIC Code 2 - enter the customer’s second SIC code if it is known.
SIC Code 3 - enter the customer’s third SIC code if it is known.
SIC Code 4 - enter the customer’s fourth SIC code if it is known.
The customer of checkboxes identifies which Sale Groups the customer purchases.
Credit Card # - Enter a credit card number if you wish to.
Exp Date - enter the credit card expiration date if you wish to.
CVV # - Enter the credit card CVV number if you wish to.
Credit Card Type - select the credit card type from the drop-down.
Name on Card - enter the name on the credit card if you wish.
We DO NOT recommend using these fields.
Mailing Group - enter a mailing group that the customer is a part of.
Associated Makes - this is a free form field to enter the equipment makes the customer owns.
Marketing Source - select the marketing source that you used to acquire the customer.
Use the button below the Marketing Source field to add new Marketing Sources.
Rates Tab
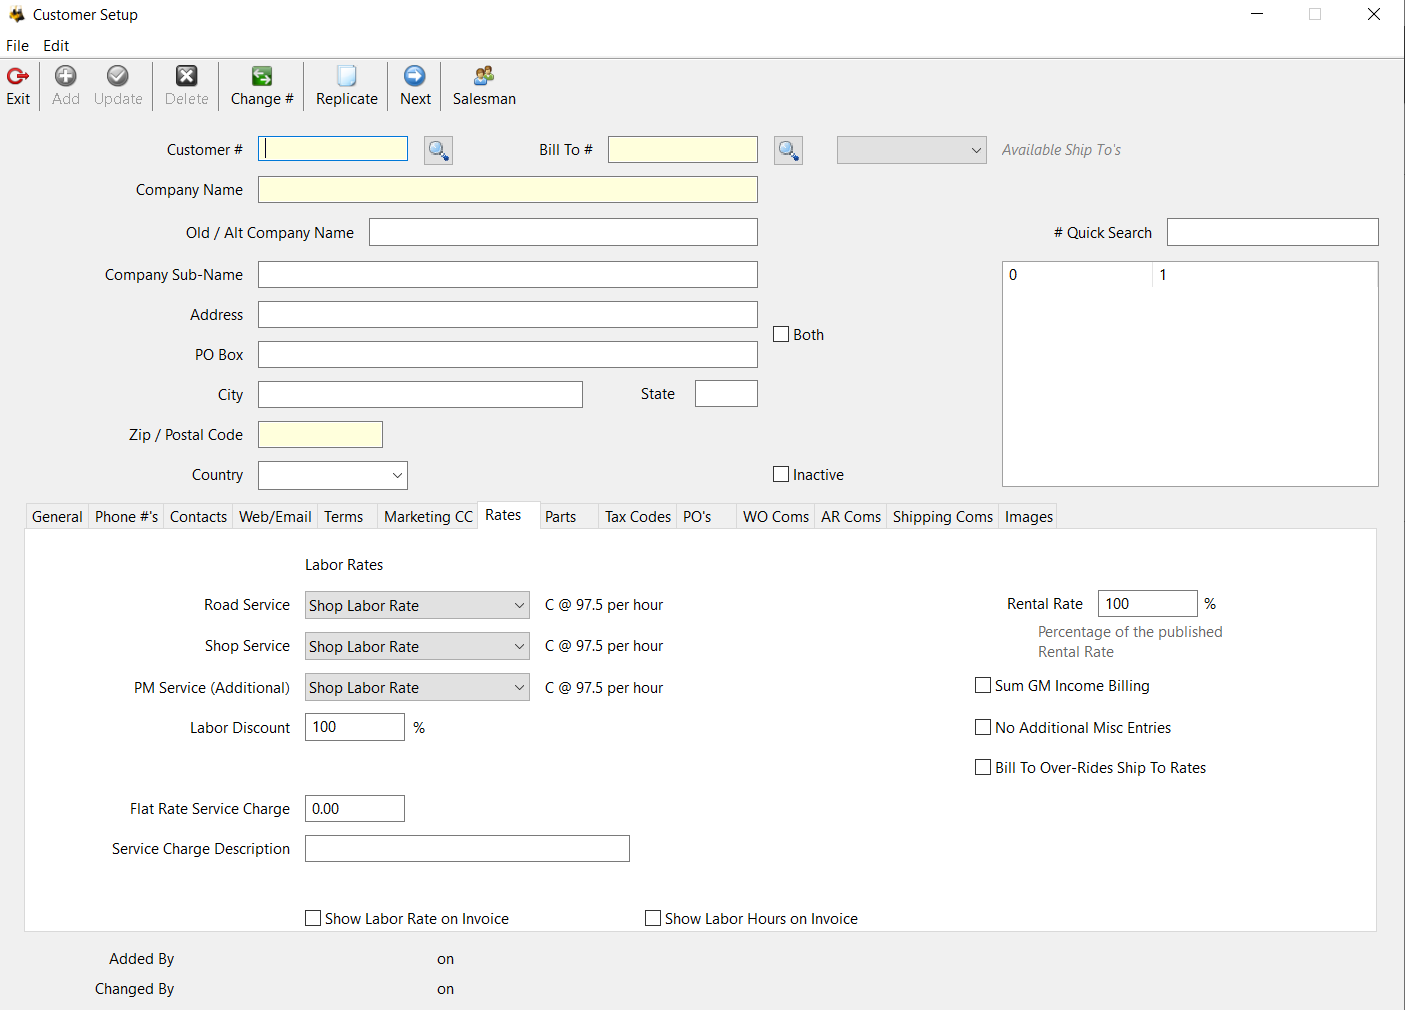
Labor Rates - select the default labor rate for each type of service work.
Labor Discount - enter the amount of the labor rate that the customer will pay. If they get a 5% discount enter 95
Flat Rate Service Charge - if there is an amount that you would like to charge the customer for all flat rate invoices enter it here
Service Charge Description - Enter the description for the flat rate service charge.
Rental Rate - this is the percentage of the retail rental rate the user pays. If they get a 5% discount off of published rates enter 95.
Sum GM Income Billing - does the customer’s GM billing show a summary dollar value versus each contract’s detailed amount.
No Additional Misc Charges - does the customer get charge for miscellaneous charges
Bill-To Over-Rides Ship To Rates - when opening a work order for a Ship-To customer the Bill-to customer rates will be used if this field is checked.
Show Labor Rate on Invoice - if checked the labor rate will print on the customer’s invoice.
Show Labor Hours on Invoice - if checked this will print the total labor hours on the customer’s invoice.
Parts Tab
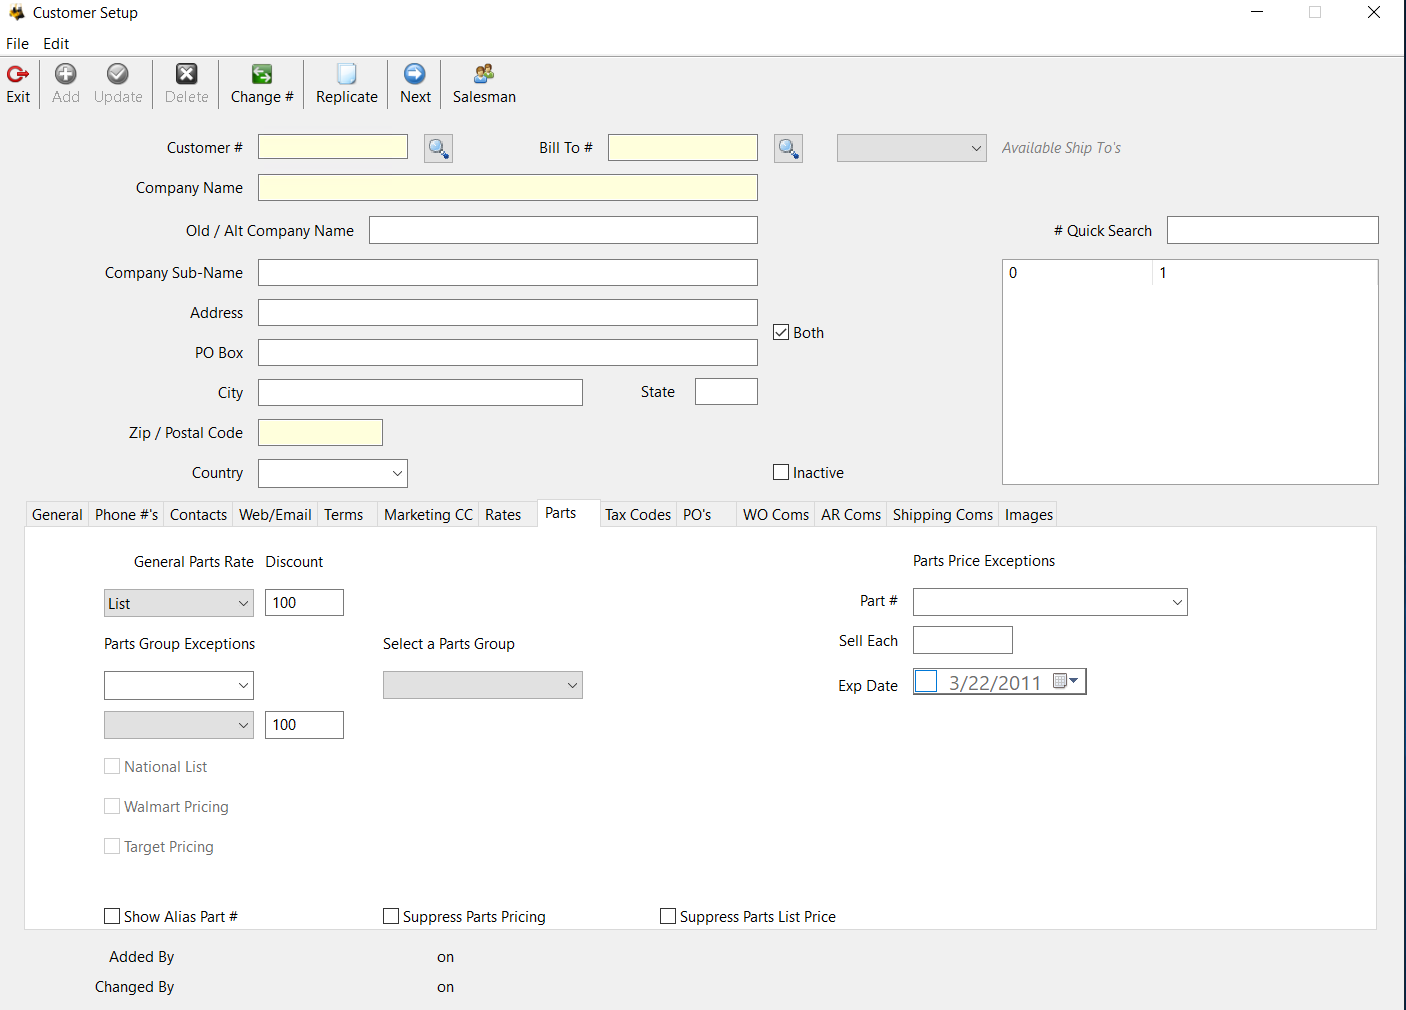
General Parts Rate - select the default pricing level for the customer.
Discount - enter the amount of the parts price the customer will pay. If they get a 5% discount enter 95.
Parts group Exceptions - parts group that the customer gets override pricing on. Select a pricing method and percentage in the fields below the Parts Group Exceptions field when a Parts Group is selected.
Select a Parts Group - a list of all parts group on the system
National List - If the parts group selected is from a Crown price tape the user will be charged National List pricing.
Walmart Pricing - if the parts group selected is from a Crown price tape the user will be charged Walmart pricing.
Target Pricing - if the parts group selected is from a Crown price tape the user will be charged Target pricing.
Parts Price Exceptions - enter a part number to establish a pricing exception.
Sell Each - enter the price you will sell the part number at.
Exp Date - enter the expiration date of the price exception.
Show Alias Part # - does the alias part number display on the invoice.
Suppress Parts Pricing - if checked parts pricing will not print on the invoice.
Suppress Parts List Pricing - if checked list price will not print on the invoice.
Tax Codes Tab
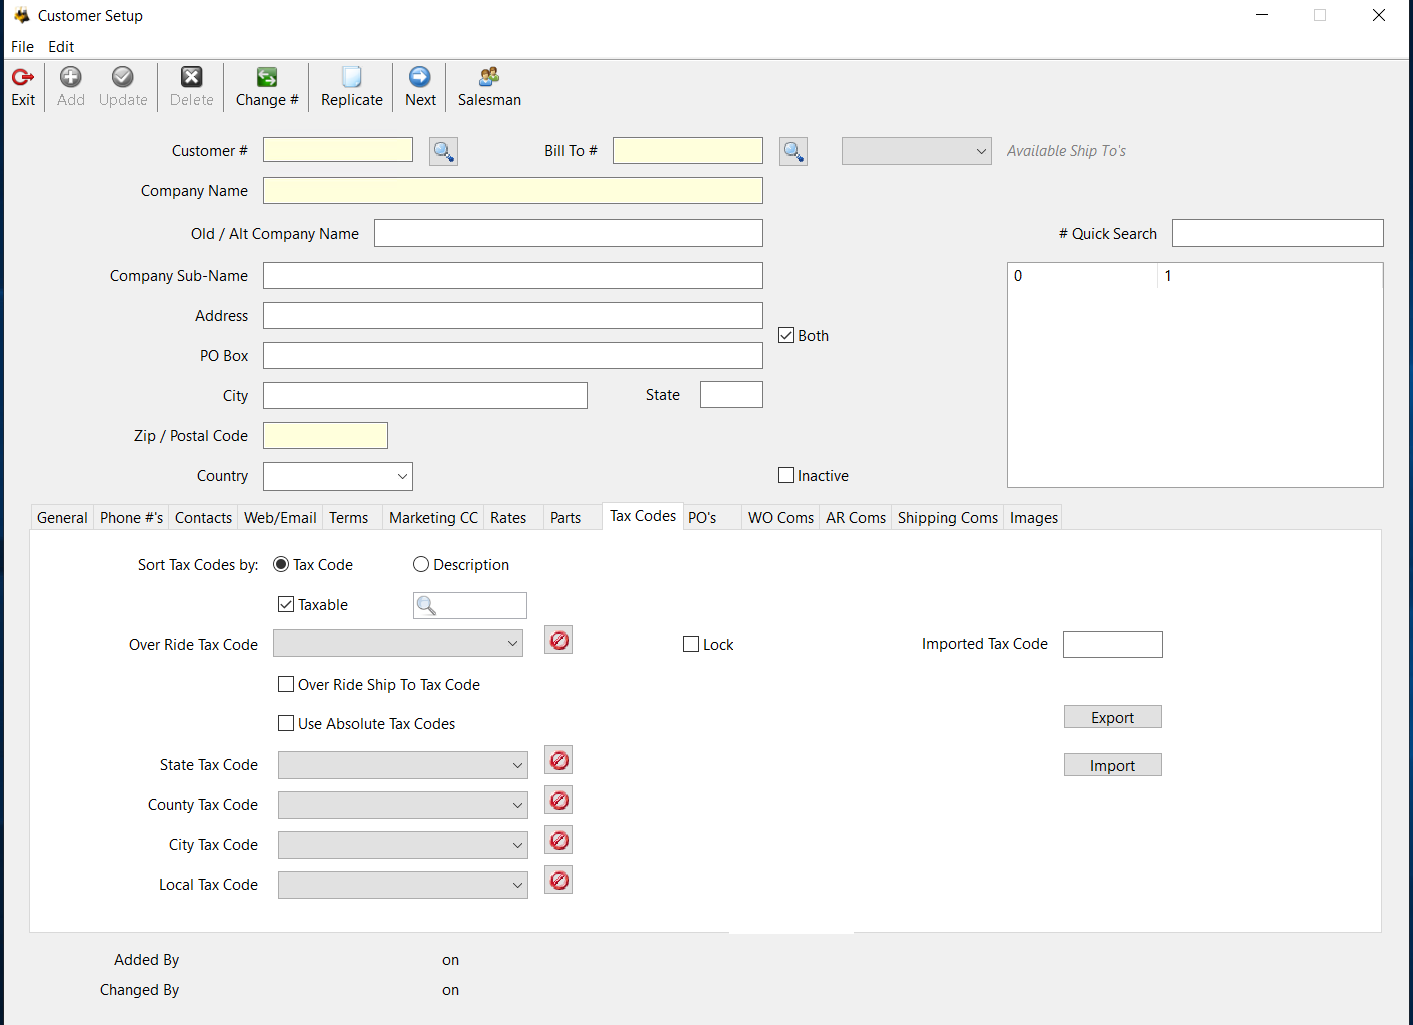
Sort Tax Codes By: defines how the over ride tax code drop-down is sorted
Taxable - check this field if the customer is taxable.
Over Ride Tax Code - the override tax code for this customer. It must be flagged as an override type in the setup to override the zip code tax code.
Over Ride Ship To Tax Code - use the bill-to customer’s tax settings for the ship-to customer’s work orders. This is set on the bill-to customer.
Use Absolute Tax Codes - use detailed tac code levels versus the single rate entered in the tax code.
State Tax Code - state tax code to use for absolute tax codes.
County Tax Code - county tax code to use for absolute tax codes.
City Tax Codes - city tax code to use for absolute tax codes.
Local Tax Code - local tax code to use for absolute tax codes.
PO’s Tab
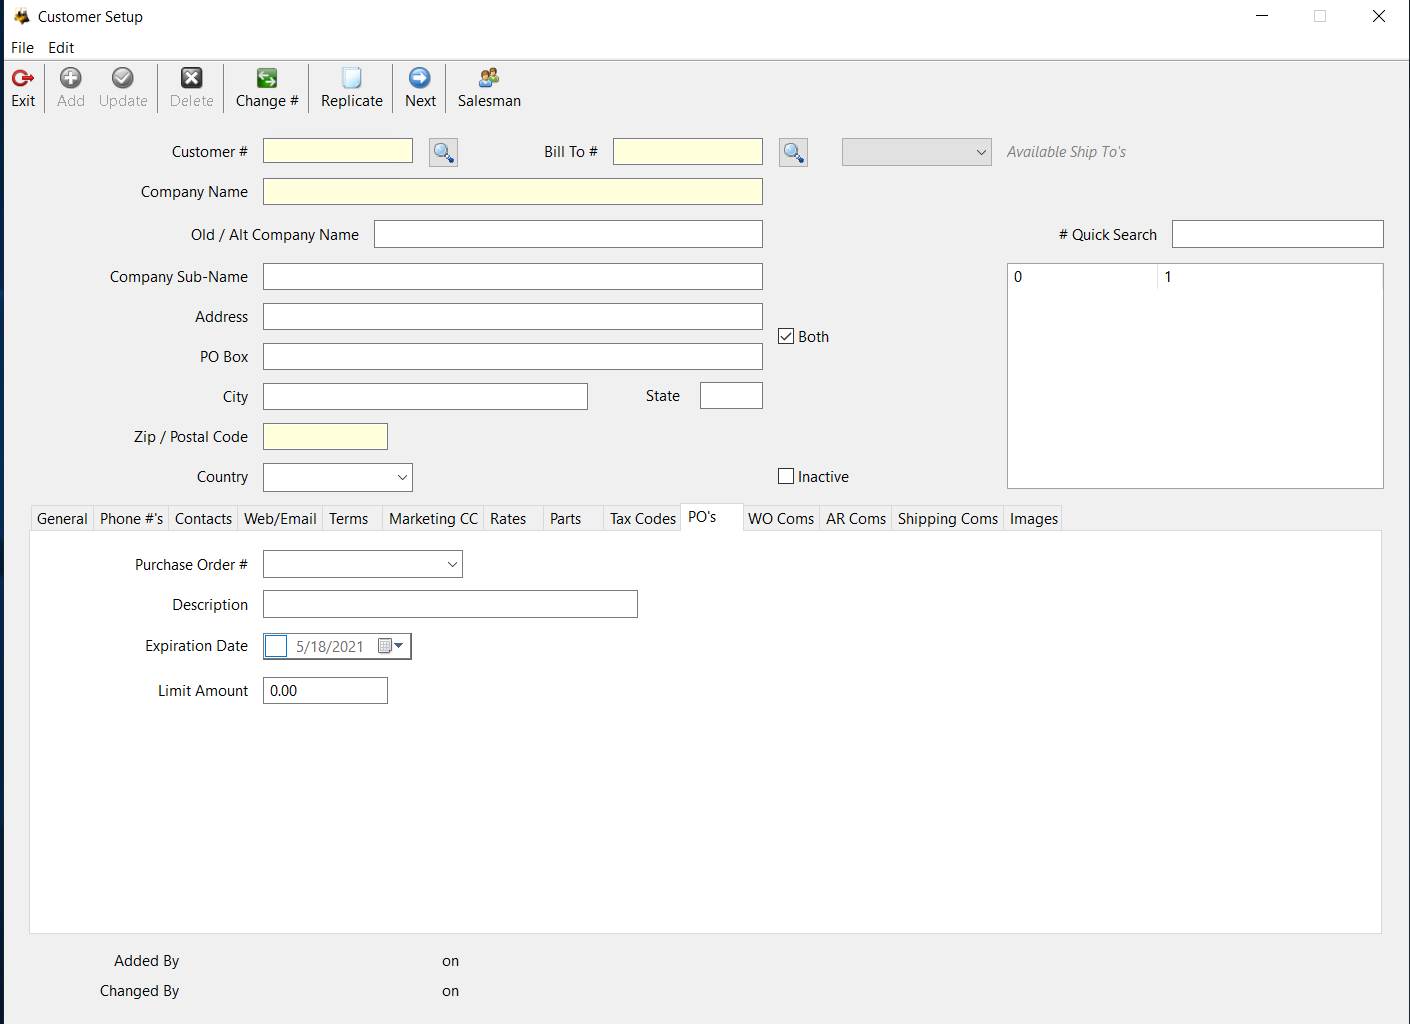
Purchase Order # - enter the blanket purchase order number if the customer provided one.
Description - Description for the blanket purchase order
Expiration Date - enter the expiration date of the blanket purchase order.
Limit Amount - enter the maximum amount that can be invoiced for all orders for this purchase order.
WO Coms Tab
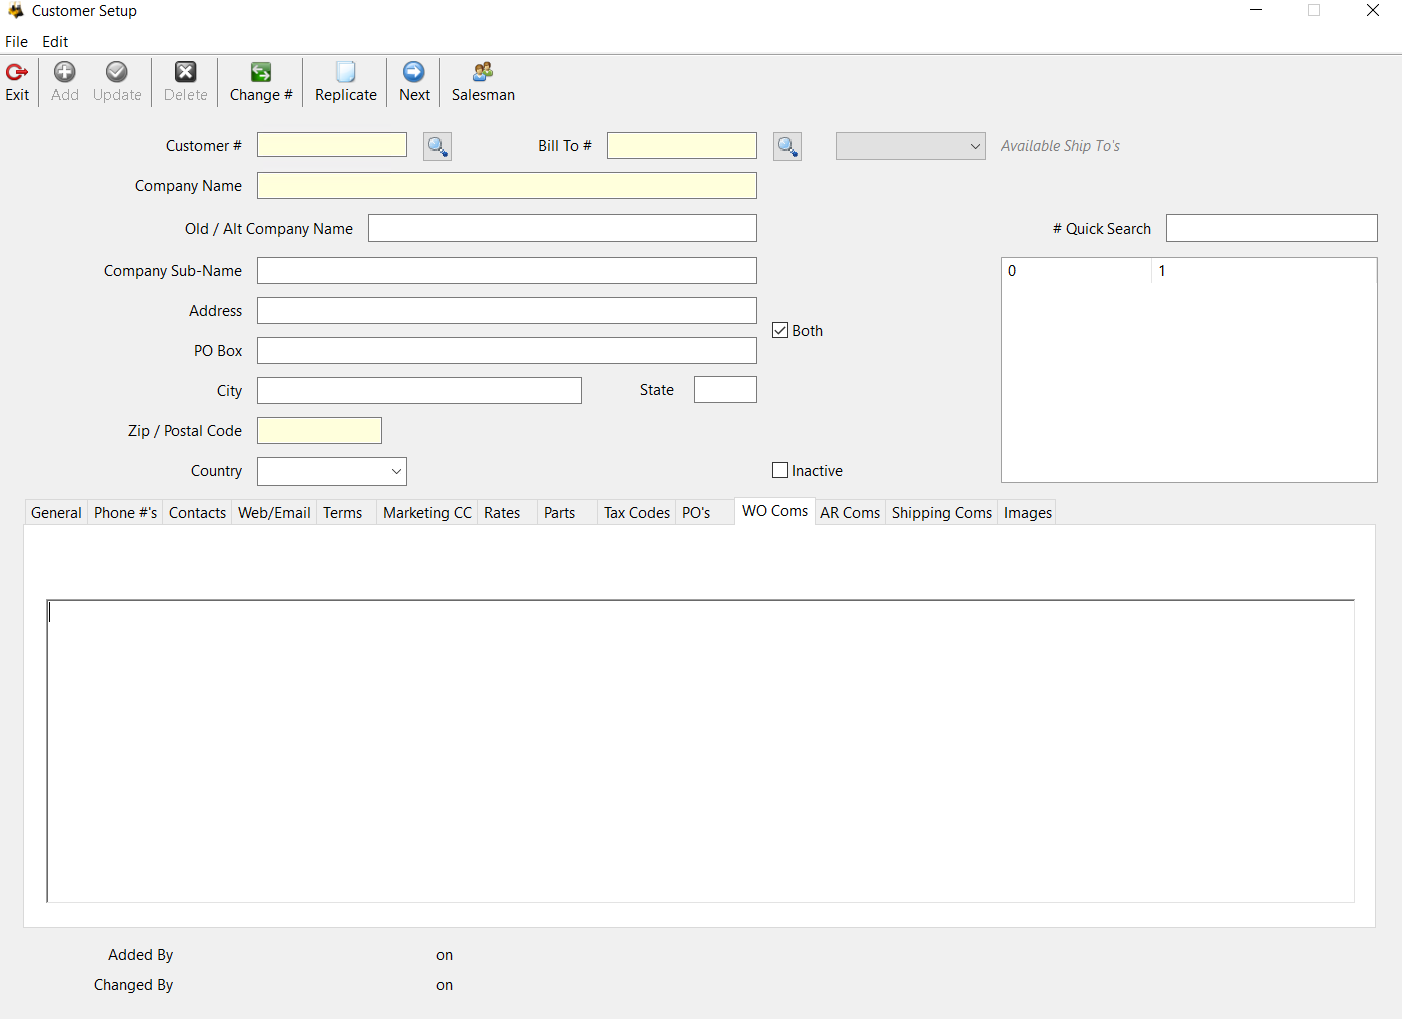
Enter any comments specific to work orders.
AR Coms Tab
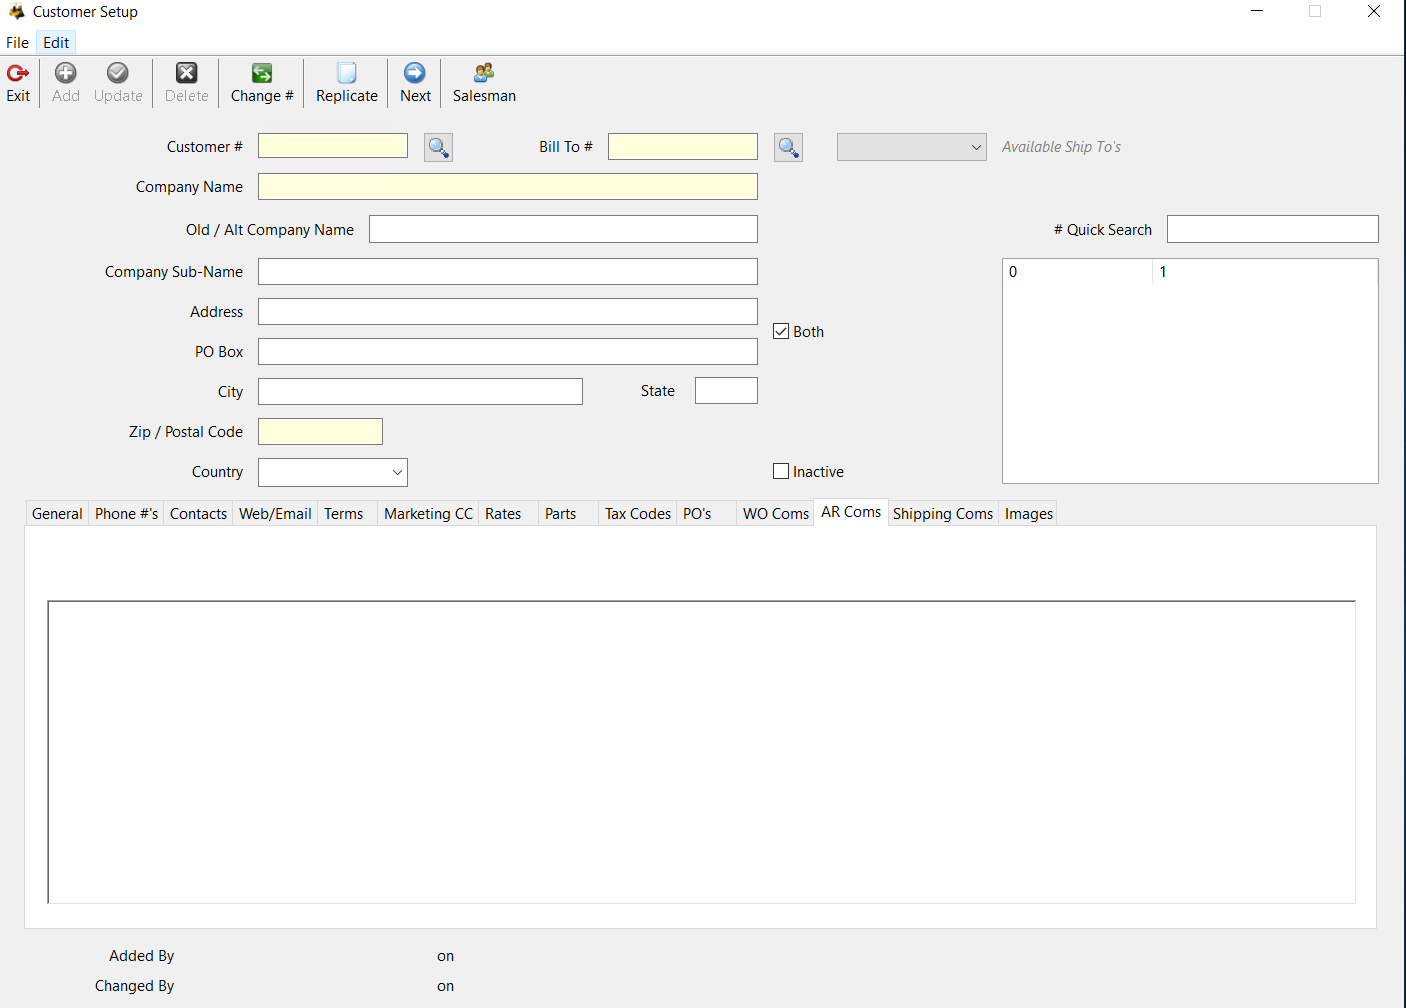
Enter any comments specific to accounts receivable.
Shipping Coms
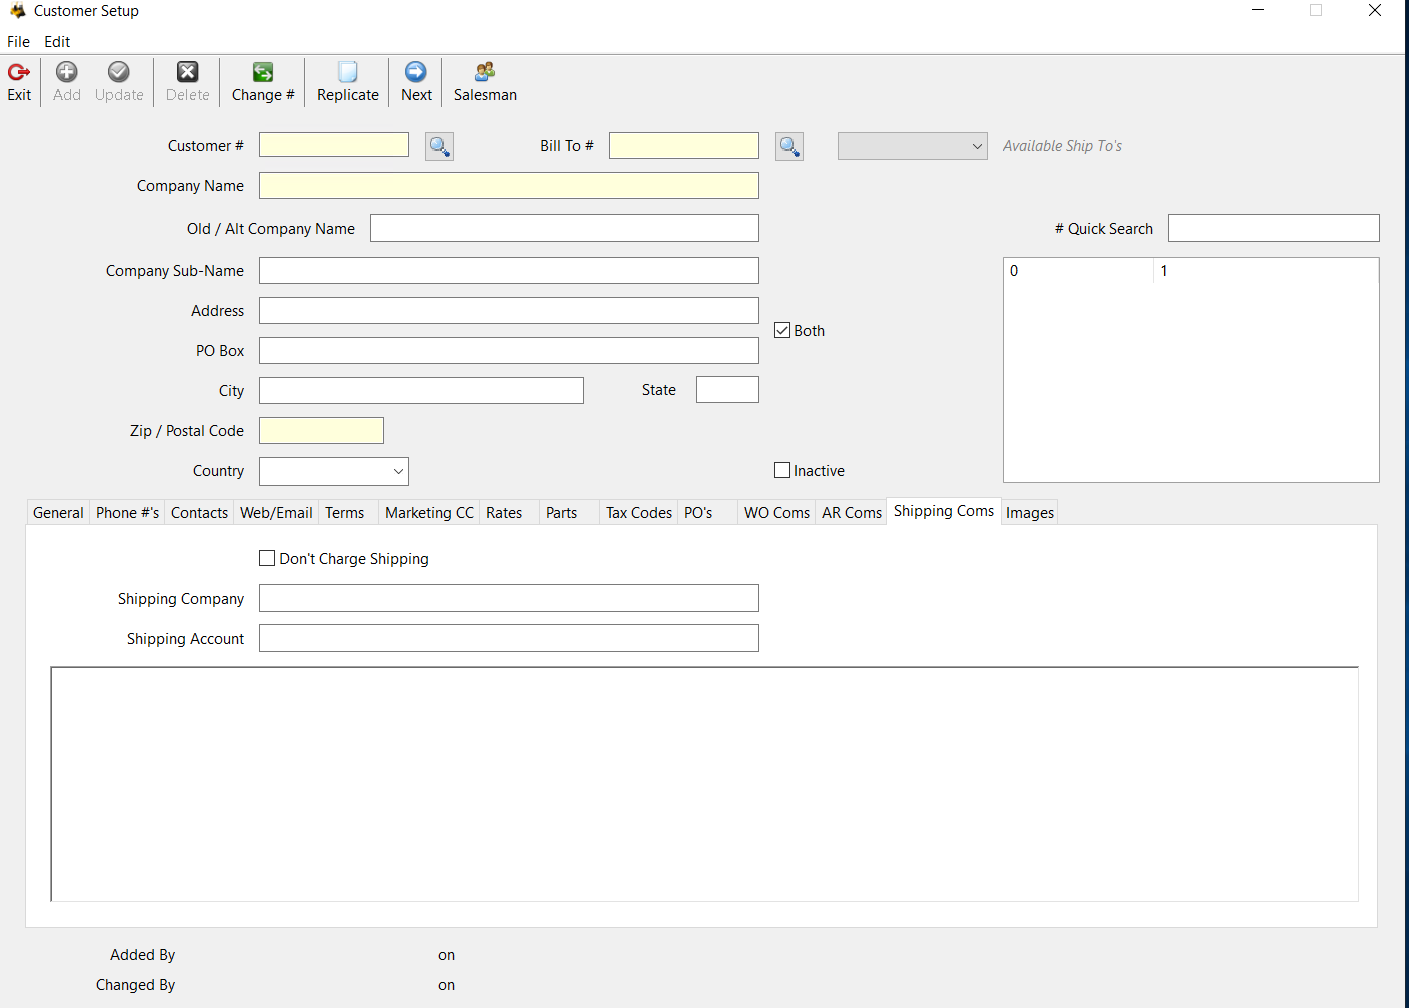
Don’t Charge Shipping - if this is checked the customer will not be charged shipping on invoices.
Shipping Company - enter the company the customer prefers to use for shipping.
Shipping Account - enter the customer’s shipping account number for the shipping company
Enter any comments specific to shipping.
Images Tab
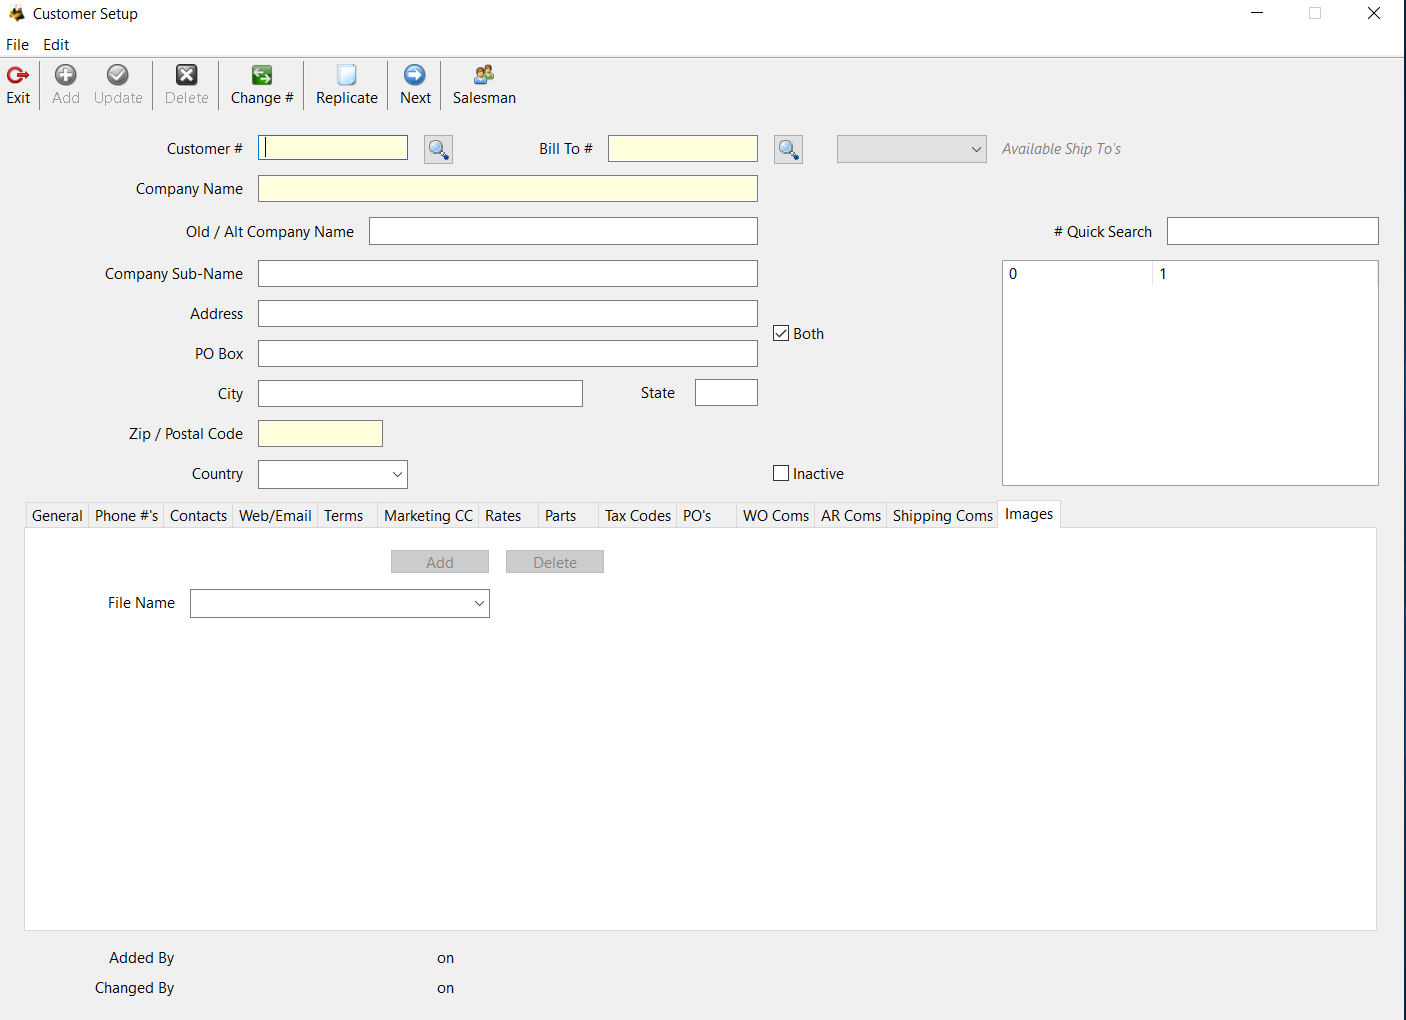
Use this tab to add any documents that you would like to associate with the customer.
Use the Add button to browse for images to import.
Use the Delete button to remove an image from the tab.
Select an image you would like to view by selecting it from the drop-down.
Was this article helpful?
That’s Great!
Thank you for your feedback
Sorry! We couldn't be helpful
Thank you for your feedback
Feedback sent
We appreciate your effort and will try to fix the article